Powered By Blogger

Saturday, January 30, 2010

You can't have too many purses!


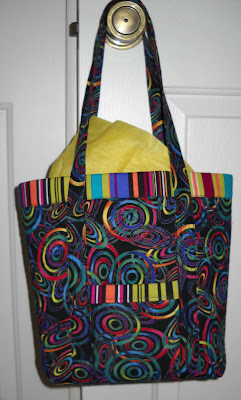
I love quilted totes and purses. And home sewn ones are the best because they're unique, one-of-a-kind pieces. This weekend I received the beauty shown above from my friend Norma. She has designed several styles of quilted purses, and named them for her daughter, daughter-in-law, and granddaughters. This purse is the "Hailey" model, and we picked out the lively fabric at a wonderful shop in Trenton, FL... Suwannee Valley Quilt Shop. We met there for lunch at the small cafe, and enjoyed a bit of shopping, too. This purse has one handy pocket outside, and more inside. A beautiful, useful, thoughtful gift!


Then there's this fall tote I made using a free pattern for the Zest Tote Bag from JoAnn Fabrics and Crafts.

Smaller projects are fun to make or receive, too. My quilting friend Freda from the Country Road Quilters in Ocala made these two, shown below. I received them in one of our Christmas gift exchanges. The smaller one is a credit card wallet, and the larger is a jewelry pouch. You can't see inside, but there are many small pockets for various size jewelry pieces. Freda also made a luggage tag and sewing caddy which were included with the gift.


Plus I've got an impressive collection of tote bag and purse patterns waiting their turn to be stitched. So there will be more fancy bags to sew and show.

Sunday, January 24, 2010

Cedar Key... it's a colorful town!


We took our bikes on a day trip to Cedar Key, FL, today. It's a small, quaint arts community and fishing/clamming/tourist village on the Gulf, along The Nature Coast. After brunch at the Island Room, we rode around the area, stopping at the Cedar Key Museum State Park and the Cedar Key Arts Center.

The Arts Center happened to have a Gallery exhibit featuring the quilting of Judy Ranz, a Michigan quilt artist who winters in Florida. Not only that, Judy happened to be there, so we had an opportunity to chat. Fellow Bernina sewing machine fans, we discussed our machines, her quilting, and fabric shopping. I was happy to meet her. The exhibit is on till the end of January, so just a few more days.

I see lots of fish in quilts, so was quite taken with these mosaic ones in front of the Center. I could see these pieced or appliqued, could you?


And then we saw this pretty-in-pink Edsel. A pink Edsel! You could buy it... it's for sale.

Thursday, January 21, 2010

Fast & Easy Scrappy Border with a String-Pieced Look


This "Harvest Chicken" quilt was made using a magazine pattern called "Chicken and Pumplings" by Mary Lou Weidman for the center. I decided to border it with a scrappy border made using fall fabrics. it was a fun project... so much so that I made three of these, giving two as gifts. The border goes together quickly, and is quite easy to complete. The quilt was thread painted and machine quilted. I did a demo on the border for my quilt guild, so will share the steps here as well.


• Cut 4 fabric squares of determined size (demo uses 9" squares)

• Place the squares right side up on a cutting surface, edges aligned.

• Make three slightly-angled cuts through all 4 layers, using a ruler and rotary cutter. Make one cut near the mid-point of the squares, and the other two about halfway between the first cut and the edges. Vary the angle of the cuts, but do not make them sharply angled to avoid unevenness and fabric waste. You'll have four groups of four fabric slices.


• Begin with the first group of fabric slices, working from left to right, and move the top slice to the bottom of the group.

• Move the top two slices from the top of the second group, to the bottom. Similarly, move the top three slices from the third group to the bottom.

• Leave the fourth group as it was cut.

• Keeping the groups in the same positions as they were cut, place all four on a small mat to carry to the sewing machine.

• Pair the top slices from group one and two, right sides together, and sew. Continue, pairing the remaining slices from group one and two, chain sewing them. Clip the pairs apart, and stack them on the mat, maintaining the original order.

• In the same manner, pair and sew the slices from group three and four together. Stack them on the mat next to the sewn pairs from the first two groups.
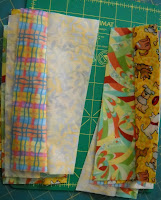
• Join the pairs to complete four border units.

• Press the units, using sizing and directing seamlines the same way.
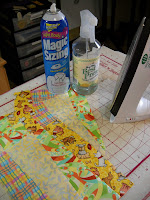
• Trim the edges of the units, and sub-cut them depending on the border width required. These could be cut in half lengthwise to create two border units, each about 4 1/2" wide.

• Join enough units to make four border strips of the desired size. Trim to length and sew two of these to opposite sides of the quilt top. There are a number of options to finish the borders. You can simply sew another border length to the remaining sides of the quilt. Or use cornerstones, as in the photo quilt.

A Purrrr..fect Helper
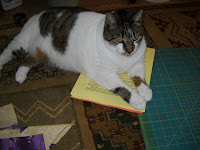


While reviewing the handout and packing up the various pieces for the demo, Mary Belle the cat strolled into the sewing room, looking for the best place to lounge. Where might that be? On top of the handouts I was reviewing. She has a knack for intuitively knowing where my focus is, what pile of fabric I'm working with, or what pattern I'm reading. And that is where she flops down! It's a gift.
Sunday, January 17, 2010

A Whole Lotta Swapping Going On...

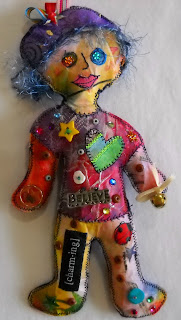
I'm participating in yet another online stitch paper swap for the Yahoo book study group. This one is for a "Love Doll". My swap partner is from Germany, so this doll will be well-traveled. Here's the book... I took it to Staples to have a spiral lay-flat binding added. They did it for less than a couple of dollars and my choice of spiral color.


Kelli, the author of our book Stitch Alchemy, noted to be careful while adding stuffing to the dolls. They are not quite as flexible as a cloth doll would be. I learned the hard way that she was right. Over-zealous stuffing ripped a hole in the seat of the doll's britches. Her back is made of craft felt. What to do? I patched her up with a heart.


This doll turned into "Love Doll meets Project Runway." She's stylishly dressed with her tee-shirt and beret. She's carrying a Bahamaian penny in one hand. It will be difficult to part with her when the time comes. I like her. Husband Jack won't be sorry to see her go... he thinks she's scary. What do you think? She could use a name, too. Any thoughts on that?

Thursday, January 14, 2010

These Little Bookmarks Stayed Home...

I've been involved in an interesting online book study in a Yahoo Group. The book is Stitch Alchemy by Kelli Nina Perkins. First we made what is known as stitch paper or fabric paper. It's made on a muslin, or other fabric, base with a glue wash and various layers of paper pieces added. Color can be added when the fabric is wet, or after it dries. And once it dries, various embellishments such as stamps and surface stitching are added. The resulting fabric paper is somewhat stiff, but you can stitch on it and with it.

Next we signed up to swap various items made with the stitch paper. One of these was bookmarks. We could make any number up to 10, send them to the hostess, and she'll return to us the same number of bookmarks, but that have been made by other group members. The swap closes today. I made several bookmarks, but these two stayed home with me..For some reason, I got pretty attached to the bookmarks and wanted to keep a couple of my own.

I'll share some more photos from this study soon. We've already swapped 6" squares of stitch paper, and there is also a love doll swap. A doll made from stitch paper.... now that will be a challenge.

By the way, adding the beads and buttons to the yarn tassels would have been difficult except for a tip I found in a book on scrapbooking. Using a floss threader helps get the bulkier yarns through the holes in the beads quite nicely.

Monday, January 11, 2010

Winter Chill in The Sunshine State

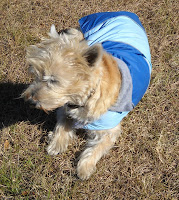
What to do when the temps in Florida dip into the teens? And it snows? There it is on the patio chair. When even Jesse needs his little coat on to go outdoors?


Stay inside and stitch the binding on a quilt. I put the prepared double-fold binding in a slippery plastic bag that has a bit of body so it can stand on its own. Then it doesn't get tangled in the quilt as I sew; it just slips from the bag as needed. This evening I'll sew the binding to the back by hand so I can be under the quilt, nice and warm. A photo of the completed quilt will be coming soon.

Friday, January 8, 2010

Serendipity at Sea...


A cruise to Nassau in The Bahamas included more than the usual straw market shopping this week. One member of our foursome remembered buying batik fabric made on Andros Island on her previous trip. We went in search of the store, but alas, no luck. However, a shop clerk described a fabric store several blocks from the town center. We hired a cab (a stretch limo actually), and off we went to Bahama Hand Prints. The store front was small and held about two dozen cotton screen-printed fabrics. Purses, totes, and handbags made using the fabrics, along with ready-to-wear clothing like robes and t-shirts, were also available. To our delight, a peek through a partly opened door gave us a glimpse of the print room that ran across the back of the building. Since the printer was just getting ready to screen print, we were given a tour and demo of the work space.


Thirty yards of fabric are printed at a time. The photo shows tea towels with the first of two colors screened on cotton pique fabric. The ink is poured into a well at one end of the screen, and then a squeegee is used to force the ink through the design areas on the screen. Four passes of the squeegee were required for the textured pique.


Each of us bought one yard of the cotton fabric for quilting, and then divided it in quarters to swap with each other. The prints are island inspired, vibrant and bright. No plans for a project in which to use them, but when has that ever been a prerequisite for buying fabric?


Goodbye to Nassau, and a delightful visit to Bahama Hand Prints.