Powered By Blogger

Monday, May 1, 2023

Quickest Quilt of All Time...


When visiting our local Cowboy Church recently, I learned that a group of members were planning a mission trip to Alaska this summer and were doing some fundraising. My impulsive response was to say, "If I can get my act together and make a quilt, would you want to use it in your fundraising?" They responded with an enthusiastic, "Yes!". I gulped and began thinking of what I could make that would be quick enough to get to them in time. The answer came in a look through my fabric stash. I'd had this Riley Blake fabric panel called Back of the Chutes for some time. Plus I had an entire storage tote containing these completed blocks. So it was a simple matter of a little bit of math, choosing some complimentary blocks and bordering the panel with them. The quilt went out to longarm quilter Debra Johnston who turned it around in record time, and Voila!- the quilt I titled "Rodeo Days" was done. The panel itself does the design work, and of course it was very appealing to the members of a Cowboy Church, among others! 


I thought I'd show you the easy blocks used in the border. Several years ago Emily Schaefer, a now-late member of a local quilt guild, presented a program on using up scraps in a fabric stash. She encouraged us to cut and sort scraps by size and color so they are ready to use in a quilt project. She was the Scrap Quilt Queen.  I took her words to heart and spent a happy afternoon sorting, pressing and cutting fabrics into 2 1/2" x 6 1/2" strips. 


I then organized the strips into groups- four of one print, and one of a second print- so they were ready to sew into rectangular blocks. I was not overly careful about colors, but there is an innate sense of making things look somewhat cohesive.


I kept a zippered tote of the pieces next to the sewing machine. Then, in the manner of notable quilter Bonnie Hunter who developed the concept of "leaders and enders", I sewed a seam on these strips each time I completed a seam on another project. It's helpful to have something "under the needle" to chain sew and prevent an abundance of thread ends. It also keeps the machine from chewing up the beginning or end of a seam, so it worked very smoothly. And the bonus is that I was completing blocks periodically. Here's a pile of blocks ready for another project. Having them on hand really added to the speed with which I was able to assemble "Rodeo Days". So there's a scrappy idea for you if you have plentiful fabric scraps. There are so many pretty panels available now, that a quick baby quilt or holiday project can be done on a moment's notice! It was just what I needed.

Friday, April 21, 2023

Upcycle for Earth Day...


The Brick City Center for the Arts in Ocala, Florida, is hosting the exhibit "Upcycled: Turning Waste into Wonder" for the month of April. Nearly 50 local artists have pieces on display. Each piece is required to contain at least 50% recycled materials. There are lots  of quirky and fun items on display, including two of mine, shown in this post below. 


It's hard to pick a favorite, but I was very taken by "Wire Horse" crafted by Elisa Prescott. Ocala is known as Horse Country, so this sculpture made from a rusty crib mattress really represents the area. The skill and finesse it took to mold this metal into shape in quite impressive.


This is my upcycled fiber bead necklace "Nothing But Scraps" made from recycled plastic drinking straws and denim scraps. I showed it along with some made by students in a class I taught on making the beads in my last post here. 


"Hearts at Home" is my other piece in the exhibit is this shabby-chic heart ornament stitched and stuffed using fabric leftovers from a local interior design firm. They would have gone to the landfill, but I got a big bag of some very beautiful fabric pieces from them. The embellishments are also recycled and include a "spray" of orange plastic produce bag and a hanger from sari silk, which is itself a reclaimed textile. I've been making several of these because the fabrics are so pretty.


Darian Mosely made the nicely textured "REforestation" with corrugated cardboard and stones.


There were other fiber pieces as well that made use of small bits of fabric. Liz Chojnacki stitched "A Whale of a Time" (11" x 14"). Lots of other interesting throw-away materials made an appearance as well. There was a full size mannequin covered with decoupage images and with a globe for a head! Very imaginative entries. All of the items needed to be for sale, and I'm happy that the necklace sold in the first week. It was so much fun that I hope the Marion Cultural Alliance will issue this art call again in the future. 


Tuesday, April 4, 2023

Accessorize!


Fashion designer Michael Kors offers his take on accessories like necklaces: "I always thought of accessories as the exclamation point of a woman's outfit." I took that advice to heart when making these unique textile necklaces. Fiber beads are just too much fun! I posted here about some necklaces I made last fall using denim scraps and recycled plastic drinking straws. The idea took off and I was invited to teach the bead making at a local guild's Quilter's Day Camp in February. I had several sample necklaces made by then, and this is one. It's made using African fabric scraps, recycled straws, and a piece from broken jewelry as the pendant. This type of bead is one of the three styles I taught in the class.


The denim beads were another style. Shortly after the class I saw a "call for art" for a gallery exhibit at Brick City Center for the Arts. The art call was for an exhibit titled "Upcycled: Turning Waste Into Wonder." According to the rules, any type of art would be considered and each piece needed to be made from 50% recycled materials. My necklaces fit the bill, so I entered this one and it was juried into the show. The exhibit is scheduled to open later this week, so I'll keep you posted about the other upcycled items shown. It should be interesting.


 Here's a close-up of the pendant and the denim beads. The pendant is a discarded earring and the beads are denim strips from worn jeans wrapped around a length of plastic straw. A few craft store accent beads complete the necklace, so it's definitely more than half recycled items.


Here are some of the necklaces made by the students who took the Day Camp class. Students traveled in some wonderful creative directions, making jewelry that expressed their personalities and interests. Terri combined two styles of beads and used some lace and yarn to embellish her beads in this piece. And the focal pendant works beautifully in it.


A University of Florida Gator fan, Lynn used the university's blue and orange colors and added a gator charm!


Peggy used yarn, glitter glue, and embroidery floss to add color accents to her necklace.


 The cute owl pendant inspired Naomi's earth tone bead choices. 


Carla brought a dichroic glass pendant and some metal beads with her supplies. She was able to combine them with her fiber beads for an elegant necklace.


And she couldn't stop at one- Carla also made this silver and denim cross necklace. She embellished her denim beads with floss and silver metallic thread. Lovely! Once we showed off these creations at the guild meeting, lots of other members wanted to learn to make the beads, too. So another class is in the works. I'll have more to show you after that I'm sure! And I can't stop making them, so there will be plenty to see.


Wednesday, March 1, 2023

Daytona Beach Shows Off...


From a beautiful daybreak over the Atlantic to the fabulous quilts at the Ocean Center where the American Quilter's Society 2023 quilt show was held, Daytona was looking lovely. This is the view from our oceanside room at the Hilton. With the window open and the ocean breezes blowing, it was a most refreshing place to stay in February. And it was just across the street from the quilt show. By the way, the link above will take you to see all of the award winners from the show.


One masterful quilt after another was displayed in the exhibit area. I noticed that dogs, faces, and floral themes were the ones that drew me in. This is "Too Tired to Play" by David Taylor. The details in the pictorial applique quilt need to be seen up close. The artist was able to capture even the color variations in the floor.


This is Andrea Brokenshire's prize winner titled "Desert in Spring". Her photo-to-quilt entry is painted and thread enhanced. So realistic and beautiful.


"Singing Bird" by Cheryl Hoffner won Honorable Mention in the Wall Quilts- First Entry category. Lovely quilting on her domestic sewing machine.


Barbara Kilbourn translated her own photograph into this quilt titled "Feathered Friend." I like the variety of quilting designs she used.


Another face quilt! "Shape I'm In" was paper-pieced by Sue deVanny of Australia. The eyes and expression are so well done with fabrics that don't have high contrast. And she has an interesting mix of quilting patterns in the triangles.


Isn't "Mother Nature" compelling? It's the entry of Maria Macheca. As in "La Catrina" below, this quilt artist developed her fabric design from a photo, this one by Kevin Mazur. When I look at the color in this photo, I realize I did not nearly capture the depth of the green. This was in the Wall Quilts-Pictorial category.


Astonishing! Cindy Stohn's work "La Catrina" won second place in the Large Quilts-Moveable Machine Quilted category. She based her design on a photo by Jaimie Emery and completed it using raw-edge applique and collage methods along with free-motion quilting.


"Renew Anew" is by Elizabeth K. Ray. This quilt appealed to me as it feels so soothing with its simple straight lines. There is even straight-line grid quilting accomplished with the machine's walking foot. And the color shifting creates an interesting optical illusion.


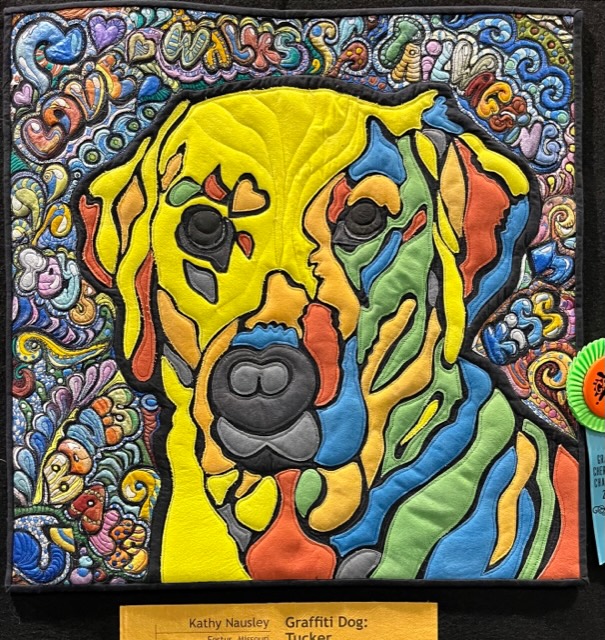
Cherrywood Hand-dyed Fabrics conducts an annual quilt challenge. The theme for this year's exhibit was Graffiti. From among 360+ entries, the company selects some for traveling exhibits. Look closely at "Graffiti Dog" to  notice the words quilted into the background- love, tailwags, bones, and more. Such detail in a small quilt.  


"Lisa G. Was Here" has so many elements of a graffiti wall. Was Mona Lisa the artist? She's got the can of paint!


Lots of color and texture were combined in "Lucky".  Lots of imagination, too.


I was impressed with how many quilt artists captured the look of graffiti fonts in their entries. "Life" is an exuberant example. They all must have studied a lot of freight train cars.


I enrolled in a half-day class with Laura Heine of collage quilt fame. Each student selected a pattern and fabric kit for one of her quilt block designs. Then we spent class time learning her methods for using fusible applique methods to assemble the blocks. I'm a slow worker in classes and did not make the progress my classmates did, so I'll show a couple of their projects and share mine when it's completed. Isn't this turkey colorful and cute?


And the snail- this floral one is so appealing. The hardest part of the class was choosing which pattern to work on. Mine is a peacock. You can see one of the key tools Laura recommends for making collage quilts which is the Applique Fuse Mat. It's a step up from parchment paper and other non-stick surfaces.  Of course I bought one to use on this and future projects.

And did I mention the vendors? Fabrics, threads, notions, patterns, sewing machines, longarm quilting machines, jewelry, and much more. After two days at the quilt show, I found myself pretty bushed from all the walking and probably from the sensory overload, too! But I'd do it again tomorrow if I could. What a treat. 


Friday, February 10, 2023

Zipping Along...


I'm pretty committed this year to using up the overabundance of supplies that reside in my sewing room. In fact when we were invited to choose a word for the year, I hyphenated the concept into my word: Use-it-up. Fortunately plenty of fun ideas abound for doing this and I came across a post by friend Robbie's Paw Prints. She had followed a tutorial by Laura Kemshall for making Upcycled Purses. I was intrigued, so I found the site on Design Matters TV where I could sign up, too. The purses are made using old quilt projects. One thing I enjoy is participating in quilt challenges and making projects to explore new methods. So there were many small projects hanging in the closet and doing nothing because there is just not enough wall space to display them all. These seemed like the perfect projects to upcycle. The little purse shown here began as a sample block, got turned into a quilt challenge project, and finally became a useful zipper bag!


This was a stitch sampler project for learning and using my sewing machine's decorative stitches. I like that it, too, has become a functional piece. There happened to be several colorful zippers in my supplies, so it worked out nicely to use them up in such a fun way.


This beaded fairy house was part of a "fantasy home" challenge. Since all of the pieces are already quilted, the zipper bags go together very quickly. And Linda has some handy tricks for sewing in the zippers easily. I didn't even need to change to the zipper foot on the machine.


Here's the back side of the dream house bag. Because Linda's online video tutorial is priced in British pounds, I wasn't sure of the exact cost. But I was very pleasantly surprised at the conversion rate that showed it to be very affordable- well under $5. So I made good use of my purchase and have continual access to the video for review as needed.


This zipper bag is made using a class project done in a workshop with Jane Sassaman several years ago. I really enjoyed giving these old projects a new life. So "Use-it-up": old quilt projects-check; an assortment of zippers-check. A nice feeling to be moving toward my goal.


Thursday, January 19, 2023

Facing the Year...


Our Fiber Art Bee had a painting party for our January meeting. The goal was to paint a face on canvas or other fabric and then use it in a project. We were all pretty intimidated since few of us felt confident about painting a face. But we persevered. Here's my whimsy face all painted and embellished with free-motion stitching. It was great fun and we all enjoyed stretching ourselves creatively in a new year.


I brought a stretched canvas to work on because I thought the taut surface might be easier to paint on that fabric that wants to wiggle around. Also, it had gesso on it already which made it helpful when painting. And canvases were on half-price sale to boot. Simple shapes- that was how we were instructed to begin. And we lightly sketched our faces with pencil first and then came in with paint.


She's progressing with her vintage-style rolled hairdo. My plan was to complete painting on the canvas, then cut it from the frame for the next step. 


Her next step is to become a notebook cover. Quite a few of my small projects become tote bags, notebooks and journals. I might as well make something useful with these experiments!


Painting faces is a messy business as you can see from our instructor's table. All of our work areas looked like this. She had several samples to share with us for inspiration and we will have our big "reveal" at next months meeting. I'm sure I can't make just one- more faces coming soon!


This is one of our instructor's samples. She incorporates her expressive faces into tote bags.


Monday, January 2, 2023

New Year, New Project...


"Use it up" is my motto for this year. I really need to dig into my fabrics and put them to work. That's what I decided to do over the New Year's weekend by making this quilt-as-you-go tote. While I have an abundance of totes, I'm still drawn to them and they are always useful. They seem to be good repositories for scraps, strips, and other smaller bits of fabrics, too. This is side one of The Alexandra Tote, and as you can see, it's not easy to get a good photo of a tote bag.


Here's side two of what is a pretty roomy bag. It was easy to stitch as well because it's a "sew by number" project. I purchased a pattern with a kit that included batting printed with placement lines and webbing for the strap handles. The strip sizes are the same as pre-cut rolls, so that could make the project even quicker. But my goal was to use what I had on hand, so I first cut strips from assorted fabrics.


Here's the pattern view which shows a few different versions. It's always nice to start the year with a quick, quilty finish, and I know I'll get plenty of use from this bag. Now to make more progress in reducing the fabrics and other supplies on hand!