Powered By Blogger

Wednesday, December 22, 2021

Little Gifts...


'Tis the season! At our recent Christmas dinner for the quilt guild in Ocala, we received several delightful gifts, most crafted by guild members. Our water bottles were topped with this cute pieced Santa topper. It's a Half-Log Cabin block fashioned into Santa. We also received a pair of craft scissors in a handy stitched holder with tuck spots for other sewing tools. Our committee did an outstanding job once again organizing a very special event capped off by a talented musical performance by a married couple singing holiday songs.


Our gifts were contained in this cute stenciled drawstring gift bag. And one member upcycled dozens of empty thread spools into clever tree ornament. There are so many tiny details including a little charm at the bottom.


And speaking of gifts, we have a number of crows on our farm- three or more are called a "murder of crows". While walking the dogs over several days, we noticed small shards of decorative house tile on the ground. And then we found these golf balls. We are miles from any golf course and nobody near here hits golf balls into a pasture as a pastime. Finally we figured out that these treasures must be "gifts" from the crows. I put them in the grotto with St. Francis. Those old quilt blocks are "aging" nicely. We started giving the crows some grapes and peanuts along the fence line, but the gift giving seems to have ended. With horses, we have plenty of grain bits and water sources around to keep them happy. I remembered a neighbor down the road telling us several years ago that she received gifts from the crows, too. We'll keep looking.

Sunday, December 5, 2021

And a Cherry on Top...


Here's a new use for an old-fashioned glass sundae dish. I was invited to fill the dish with a pincushion that would hint at an ice cream sundae. The coordinators of the raffle baskets at our recent quilt show assembled many wonderful baskets built around a theme. They received the dish as a donation and wanted to fill it sewing style. So this is what I came up with. The bottom is weighted with glass pebbles and the whole thing is topped off with a fancy beaded stick pin. 


The daughter of a guild member saw the pincushion and asked if I could make some to sell. I don't often sell things I've made... I am really stumped when it comes to putting a price on them. But she was so delighted with the pincushion that I told her I'd get started. I am awaiting the glassware for them. She has since found two sundae dishes in a thrift shop, and by chance I began by stitching these two. So when all the parts get together, the job will be completed. They look a little like giant stuffed yo-yos. One small template, shown at left, is the only pattern piece required. Eight of these wedges cut from assorted fabrics for each pincushion are stitched together, stuffed, and then embellished with embroidery floss and a T-shirt beaded ball or other topper. The idea came from "Last-Minute Patchwork + Quilted Gifts" by Joelle Hoverson. It makes a unique and fun gift I'm thinking.

Monday, November 22, 2021

Let's Visit the Quilt Show!


Everyone was so happy to get back to a real in-person quilt show. I'll share some of the quilts from our Country Road Qulters show (Ocala, Florida) in this post. Here is Kay Smith with her Best of Show quilt. Kay is a master at piecing as you can see in her Seminole-style quilt. She was also the mastermind behind our new professional hanging system and the layout for all the quilts. Some of those pieces in Kay's quilt are very, very tiny.


Jill Allen is another guild member who is an accomplished and prize-winning applique artist. Her work is all done by hand, right down to the quilting.


The fall colors and contrasts of light and dark in this pieced quilt are so beautiful. It's the work of Judy Nowak.


Group members took part in a quilt-along project for 2020. We received part of the pattern for Piece and Plenty quilt each month. It was fun to see how different members completed the project with different colors, fabrics, and layouts. This is JoEllen Oppliger's entry titled "A Tisket, A Tasket". 


The variety of basket blocks in different techniques is such a nice combination. Leanna Burgin made this first-place entry, "Posies for Sale".


Carol Allen was thinking small but meticulous when she pieced this "Star Pineapple," prizewinner in the Miniature category.


During the stay-home times of 2020, guild member Richard Mitchell collected blocks made by members and assembled this "Together Apart" quilt. Didn't he do a great job with the setting? My block is the house block with embroidery, 4th row from the bottom, second block from the left.


Debra Johnston combined some nostalgic bits in "A Few of My Favorite Things."


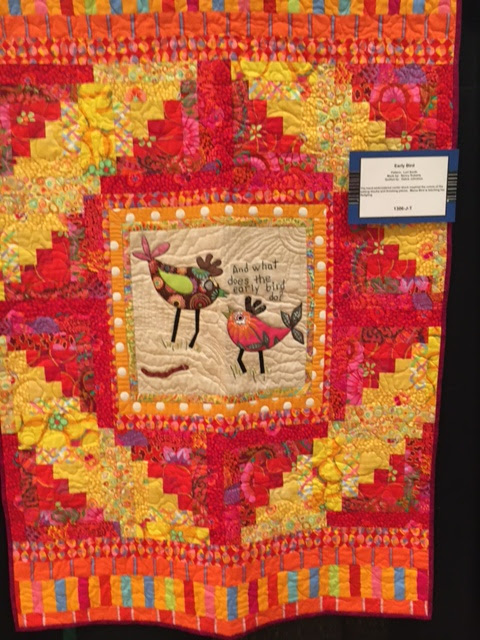
One of my entries was the "Early Bird" quilt. It was a fun quilt to piece and so vibrant.


A special display showcased some of the projects our guild makes as part of our community outreach.


I found this quilt just mesmerizing! It's "Fire Island Hosta", Rose Frierman's version of a Judy Niemeyer pattern.


And just look at the wonderful machine quilting in Brenda Crisci's whole cloth "Opal Essence" completed on a Dream Big panel.


While it was a lot of work, the two-day show was a breath of fresh air if you love quilts and have been missing seeing them hang in a public display. If you'd like to see a video with all of the entries, one of our members provided a YouTube video of the show. See it here. I hope you enjoyed all of the eye candy! 

Thursday, November 4, 2021

The Bottom of the Bins...


Somehow I allowed an entire month to go by without a blog post. Time sure seems to fly past at an alarming rate! Part of that time was spent on a computer melt down that required the time and money investment of a new computer. Rebuilding and signing into accounts again was not fun. Then some road debris cracked the windshield on our car which also required a replacement. But I did finish this quilt-as-you-go quilt project I'm calling "Bottom of the Bins". I was determined to use only supplies and fabrics I had on hand. Blocks are quilted at the same time they are pieced by using a flip-and-sew method. Fabric strips cut in various widths are sewn on a batting square with backing fabric as a base. Once stitched, pressed, and trimmed, the blocks are joined in rows with narrow sashing between them. It's a colorful way to use up scraps, and a fairly easy project. Believe it or not, I still had a lot of strips left to give away at our guild's free table. Scrappy quilts are my favorites I think. And it really is square- the photo angle makes it look less than.


The quilt is reversible and I decided to use an assortment of reds and pinks for the backing squares. I just cut and pieced to my heart's content until there was a big pile of blocks. That's when I thought about what that backing was going to look like and got concerned it could look like quite a jumble since I'd done no planning. So I counted up the number of blocks sewn on each of the red/pin fabrics, got out a piece of graph paper, and recorded positions for the blocks that would have a little balance to it. It's not bad, though a bit eye-popping with all that pink.


After the computer and the windshield problems, I was waiting for a third. You know that saying about things happening in threes? This was a small one and it happened to my iron. I was adding an iron-on jeweled element to a tote bag project. The instructions told me to cover the element with a heat resistant sheet to protect it. There was a square of something in the package I thought was the cover sheet. I have a Teflon sheet, but this one was just the right size and at hand so I decided to use it. Oh my! Apparently it was just a packing piece and was not heat resistant at all. It melted right onto the bottom of the iron. I thought it was the end of the iron, but once it cooled down, the piece peeled right off. I'll just need to clean the bottom of the iron to make sure it's all gone. And the jeweled element was not harmed. But the piece left behind sure tells the story!


I'm off to the quilt show this weekend. Our guild is holding a two-day show that at last got rescheduled from the pandemic. I'll share some photos from that in my next post.

Thursday, September 23, 2021

If It Isn't Moving...


Things that don't move fast enough in my sewing room are likely to get stitched! It happened to this small watercolor painting. I've always liked watercolors, but don't excel at using them. Undaunted, I keep trying. When my local library branch offered a class in using watercolors, I signed up. I enjoyed mixing the colors, finding a light source, and a few other techniques in this basic "101" class. Once I painted the pair of pears, I knew I wanted to accent them with stitches. So I did some free-motion stitching around the pears, and then regular stitching to frame the piece.


A nice thing about the class is that the instructor brought all of the supplies and brushes ready to go.


I'll try all sorts of tutorials for watercolors, and this folk-style house was one. Using crayon marks as a resist, we then filled in with various watercolors. It was a fun project, and it got stitched, too. I appreciate the YouTube instructors who make these learning projects available.


This tutorial was on making "messy" mandalas with watercolors and allowing the colors to flow and blend. Very freeing because I think I try to control watercolors and it just can't be done... not by me, anyway.


This is another messy mandala with a free-motion stitched edge. All of these pieces are going to go together in some type of journal. I'm still inventing that in my mind.


I'm even planning to add stitching to this watercolor girl completed in another online class. I'm not sure how yet, but I think she will be enhanced with sewing. She needs some color added to her eyes and other features as well, so she's a work in progress. I really enjoy sewing paper... it's almost as much fun as sewing quilts!


Saturday, September 4, 2021

One For the Critters...


This post marks the passing of our dear kitty Lily. We called her "Lady Lily of Hawthorne" because of her regal personality and haughty glances. She was royalty... she thought. We found Lily as a kitten on a remote section of a bike trail in 2010. I told her story in this post back when we didn't know if her name was Lily or Libby yet. She was a sweet girl.


I brought her ashes home from the animal clinic and they remembered her with this nice card about The Rainbow Bridge.


We have a beautiful grove of trees next to one of our horse paddocks, and it's become the resting place for the pets who are no longer with us. This crumbling tree in the grove kept catching my eye and I decided it would make a perfect grotto for a St. Francis statue since he is the patron saint of animals. He can watch over the grove and all the critters. Our dog Abby plays in the grove every day. She runs out with her toy and digs and plays and enjoys herself. So it is definitely a place for animals.


St. Francis has a shelf in the tree hollow decorated with a few vintage quilt blocks that were already in tatters. I walk the two dogs by it each day and enjoy seeing it there and thinking about the animals. My whole family has a heart for animals and can't imagine life without them.


One reason I love to visit a local farm market is because they have a yard full of wonderful creatures. One of my favorites is this handsome turkey. Good news- he is considered an ornamental bird, not bred for meat. He is a Royal Palm turkey and he presides over the farmyard in a grand manner.


This bold fellow showed up when we were eating lunch at a local state park. I'm sure people must feed him because he was pretty fearless. An entertainer for sure.


Another beloved "animal ambassador" was the famous Quarter Horse stallion Rugged Lark. He lived to the age of 23 and delighted many with his personality and accomplishments. This bronze statue was installed in his memory at the World Equestrian Complex in Ocala. We had the opportunity to meet Rugged Lark and tour the farm where he lived near us. We got a photo of him bowing down to greet us. An amazing animal. Don't we just love our critters, and don't they provide such companionship and joy?

Saturday, August 14, 2021

A Slice of Florida...


After visiting the quilt exhibit in Dunedin, our merry band of travelers drove the short distance north to Tarpon Springs, and the Leepa-Rattner Museum of Art. That's where "Floridian Flavors: Characters, Culture, and Cuisine" is on display. It's a juried exhibit by Florida quilt artists and members of Studio Art Quilt Associates. Quilt artist Gretchen Brooks of Gainesville offers a cross-section view of citrus fruit in her colorful "Citrilicious" quilt. Kiwi, pink grapefruit, lemon... you can almost taste the flavors.


In another entry, Gretchen Brooks examines "What Lies Beneath" Florida's waterways. She used so many fabrics, fibers, and stitched embellishments in this absorbing wallhanging.


Martha Wolfe, a California exhibit juror, displayed this quilt made from her time spent on the beaches of Florida. It's titled "A Time to Quilt (Tern, Tern, Tern)" and was made using a raw-edge applique technique.


Doris Hulse of The Villages captured the "Fisherman's Intent" in this story-telling quilt. She transferred her photograph of a charter boat captain deftly cleaning the day's catch. She then over-painted the image with Inktense color blocks and heavily machine quilted it.


Do you feel as if you are looking at a vintage tea towel or cartoon place mat? Those old Florida images were the inspiration for "Florida Spirits", an absorbing hand-painted and appliqued piece by Susan Rienzo of Vero Beach. Look close to see all the details from space launches to flip-flops and beach umbrellas.


Florida's many clear freshwater springs are a big attraction in the state, and "I'm Okay" is  an entry by Brenda Shutter of Titusville. She expressed an image of an adventurous cave diver returning to the light and the water's surface by using textile paints mixed with glow-in-the-dark paint.


Seminole piecing is a patchwork method perfected among members of the native Seminole tribe. Strips of colorful and intricate pieced patterns are sewn together in horizontal bands. Often seen in skirts, jackets and other clothing items as well as dolls, the piecing method is also popular in quilting. The image applied to the background of Trish Hodge's (Sarasota) "Homage to Seminole Quilters" shows a native stitcher wearing a traditional Seminole pieced skirt and sewing on a hand-crank sewing machine.


One of our travelers, Kay Smith (Ocala), also had a Seminole-style pieced quilt titled "Tamiami Mosaic" on display. Kay has made several beautiful and prizewinning quilts using this method. She grew up in Miami and her family would often visit the Seminoles in Dania, Florida. She was amazed at the colorful designs the women pieced using hand-crank machines in their Chickee huts that had no electricity. She added embroidery to mimic the rick-rack that was often a part of the Seminole designs.

If you'd like to know more about the Seminole style of piecing and history, here's a link to the Florida Museum's site with in-depth information. And if you'd like to see more of the quilts in this wonderful exhibit, click this link to visit the SAQA slide show.

Visiting inspiring quilt shows like this one just makes me itch to stitch!

Friday, August 6, 2021

Color Explosion Road Trip...


Three intrepid quilting friends and I took a two-hour drive to Dunedin Fine Art Center (DFAC) in Dunedin, Florida, recently to visit and appreciate some wonderful quilt exhibits. Top billing at the museum went to The Tentmakers of Cairo exhibit, shown here. Based primarily in "the market of tentmakers" in Cairo, Egypt, the men who stitch these pieces, are a combination of artist, maker, and entrepreneur.


There were a lot of quilts beautifully displayed. The color washed over us the minute we entered the room.


The art form, which features intricate applique motifs stitched on a whole-cloth background, began in a utilitarian way. At one time, the homes of nomadic people in Egypt were constructed with canvas walls and roofs. The tentmakers began to enhance the plain inner walls with bright stitched elements like those seen in these quilts.


You can see the detail, expressiveness, and imagination of the designs in this close-up photo.


Cotton textiles are used for the motifs which are accented with stitchery. You may be able to see that the background fabric is often a more canvas-like cotton, as in this example, which is heavier than quilting cotton. I couldn't help but consider how tough that is on the hands when sewing through the layers. And the men sew quickly and prolifically, which you can see in a 3-minute video from The Quilt Show I'll link here.


The profusion of color and design is very absorbing for viewers. While no longer used for walls and roofs of dwellings, the quilts still have a ceremonial use for weddings, funerals, and faith celebrations. And art collectors purchase them for wall art. DFAC offered a price list for any of the pieces that were for sale.


The tentmakers were teaching a class in their methods at the museum.


There was also an exhibit titled The Return of Velvet Elvis. Local artists could try their hand at painting on a black velvet background, in a style reminiscent of the 1950s when images of Elvis Presley were popular. I thought this entry captured our last year-and-a-half quite nicely! There were other exhibits at the museum as well, and we also attended the Studio Art Quilters Association show in nearby Tarpon Springs, Florida. More photos from those in my next post.


Thursday, July 15, 2021

Baubles, Bangles, Bright Shiny Things...


In the "can't stop playing" department, we find my most recent creative jewelry projects. Having enjoyed making Boho beads and bead dangles to the point where there are a multitude of them along with charms just sitting in my sewing room, I knew they needed a home. Where better than on my arm? And so these bracelet wraps were born. it doesn't take many supplies or much time to fashion them, and they are fun to make. My Fiber Art Bee friends expressed interest in how to make them, so recently we had a little demo at our Zoom meeting. One piece of good news we heard is that the group is now  cleared to meet in person starting in August.


This is the bracelet I began in the online demo and have since completed. It's made using memory wire as a base. The wire is wrapped with sari silk ribbon to cover it. For this bracelet, I did wrap the wire first with strips of muslin just to provide a bit of padding and to conserve the sari ribbon, which is the final outside wrap. This one features vintage sari silk ribbon, lampwork bead dangles, and charms which include my initials. I've also done an over-wrap of fine gauge wire with seed beads to add more bling. I'll share the steps below in case you'd like to give this a try yourself.


One reason I like these bracelets so much is that I have thin wrists, so finding a bracelet that fits and doesn't slide off is a task. These bracelets conform to any size wrist- one size fits all! The above photo shows the bare bones of a bracelet. I begin by wrapping the wire around my wrist and then using wire cutters to cut a length of memory wire that has about three loops. Any more than that becomes difficult to handle when wrapping with ribbon. Then I use round-nose pliers to form a closed loop at each end of the wire so there are no sharp ends to catch on clothing or poke uncomfortably.


This tray shows the tools of the trade for making the bracelets. Once the wire is cut, you'll need some fabric glue to secure the ribbon or fabric strip at one end of the wire while you wrap. The memory wire is shown in the upper right- it's kind of like a slinky, forever holding its loops. Also shown are wire cutters and the pliers. In the center of the photo is a bobbin used for holding fibers when doing Kumihimo (a braided cord technique). If you are old enough to remember Spoolie hair curlers... the bobbins are like those. And, oh my goodness, they still sell them! I've wrapped the sari ribbon around the bobbin and closed the top to hold it while I wrap. It's a handy tool to have, but not required. You can just form the ribbon into a skein to keep it manageable for wrapping.  Once you have your bracelet wrapped, just over-wrap it with thin wire and seed beads. Then add bead dangles and charms with jump rings to decorate it. Have fun and make one to match every outfit!