Powered By Blogger

Saturday, November 23, 2019

Leaf Peeping, Florida-Style...


It's generally thought that Autumn in Florida is a colorless affair. But that's not true- I see signs of trees changing color here. Not the splashy, deep colors of more northern regions, but greens do turn to soft golden colors on some species of trees. That subtle color shift inspired these fun leaf bowls. The Palm is made using batik fabrics in assorted green-brown-gold prints.


And the Maple has the traditional orange-brown tones. I used a pattern called Natural Inspiration Leaf Bowls. And I used a material that is new to me- Bosal, a heat-moldable fusible product that gives the leaf bowl its shape and firmness. Soft when heated, hard when cooled- the bowl is malleable as long as it's warm. The free-motion stitched leaf veins and the zig-zag edge stitching were completed prior to heating and shaping.


The bowl is constructed similarly to a quilt- there's a backing, seen in this photo; a middle layer which is the Bosal in this case; and a top, which is made using 8 different fabric prints. I printed the pattern pieces on a sheet of printable freezer paper, cut the pieces apart, and ironed them to the various fabrics ready to cut out and place on the Bosal. The three layers are then fused together, stitched, and shaped. The bowls went together pretty quickly, and while I was thinking the Bosal was going to be too much to sew through, it worked just fine. As a former editor, my eye went right to the statement on the package- "Stiffness that permits you to heat the material and shape it into any!" Ummm.... I'm left with the question- any what?


The Palm is a great container for some notions I was given by a fellow quilter- vintage button cards and an interesting buckle. I love the doctor and nurse depicted on the pearlized uniform buttons. I'm guessing these are from the 1950s or '60s. I'm often the recipient of "found" items because people know I have an affinity for these little odd bits they come across. The items often find a home in one of my projects, and I appreciate the gifts! I recently got a large bag containing an old YoYo quilt- badly made but lots of fun fabrics. I wonder what I'll do with it? Ideas are forming already.


Sunday, November 10, 2019

Bits and Pieces...


Bits and pieces sums up the past month or so for us. We have been traveling some, I've been sewing and crafting some, and visiting family. So this post is a collection of photos on assorted topics. First off, I dug this crazy-pieced heart out of my unfinished projects bin and decided to complete it. It began as assorted scraps of silk neckties. Once I pieced it together, embroidered accents were added. Then I cut and stuffed the heart shape, finishing it off with a few buttons and a beaded edging. I think a couple more tiny buttons are in order along with a beaded wire hanger. It's just the kind of relaxing hand work I enjoy doing in the evenings.


One of our trips was to Arizona in late October, beginning in historic Prescott. While there, we met these museum docents and their little sidekick strolling the streets of downtown. They were happy to oblige me with a photo. Some of them made their own costumes representing the styles of territorial Arizona- a feat I found most impressive. The woman with the carpetbag had made hers, including the quilted and piped short jacket. These docents volunteer at the historic opera house. 


We drove on to Sedona where we visited a collection of charming shops at Tlaquepaque (think Ta-la-ka-pocky). It looked like Autumn with the lovely gourds and pumpkins artfully arranged in the fountain and throughout the grounds. 


And of course, the magnificent red rocks of Sedona never disappoint. I can gaze at them for hours.


One new stop on our Phoenix to Sedona loop was at Western Spirit, Scottsdale's Museum of the West. There were saddles, chaps, and bits galore, along with beautiful paintings and Native American artifacts. This trompe l'oeil (fool the eye) painting was interactive, allowing us to become part of the scene. The horse's muzzle and pond were painted on the floor where we stood. The rocks and sand continued up the wall behind us. The museum docent instructed us where to stand- Jack is at the front and was holding his hand in the air as instructed. I stood further back and also posed as directed. He then took the photo that has us looking as if I'm petting the mane and Jack is ready to leap into the saddle. See that outlaw behind and above me? No worries- he's no match for me- I've got a badge! This was such a clever display.


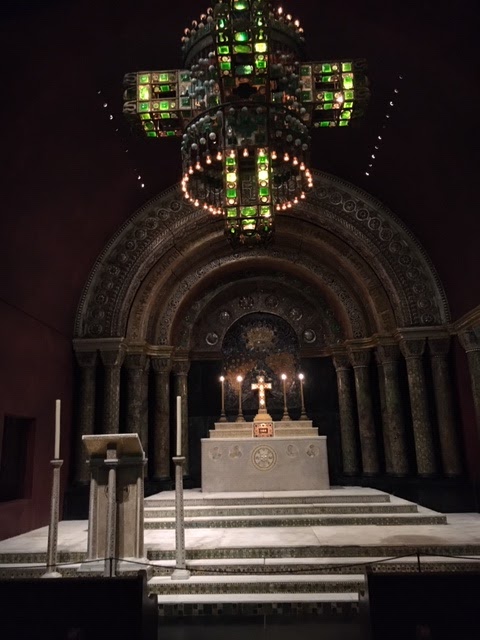
 Another trip to South Florida to visit family included a stop at the Morse Museum in Winter Park near Orlando. I've been wanting to visit here for a long time. The museum houses a wonderful and extensive collection of works by Louis Comfort Tiffany and non-flash photography was allowed. Included in the collection is this chapel which was once part of the 1893 Chicago Exposition. Imagine that! It was large and awe-inspiring. There were many other stained glass images, lamps, and paintings as well as introductory videos to acquaint visitors with the collection. Well worth a visit.


Winter Park itself is a quaint small town with narrow brick-paved streets and plenty of unique shops. They even put out a bowl of peanuts for the squirrels! I hope you can see it at the bottom of the photo. Now, I really must get back to the sewing room.


Monday, October 28, 2019

Seeing Red...


Please meet Freddy LeRouge. Freddy is a noted lepidopterist as you can see from his shirt and his fluttering friends that surround him wherever he goes. He also moonlights as a model for headache medicine. Perhaps you can tell by his general droopiness that he is the "before" model. Freddy is just one of the LeRouge Family that came into being at the recent birthday celebration for Quilters of Alachua County Day Guild. 


We were definitely seeing red. Oh, but there was a lot of red! All over the work tables. Once again, our challenge was to work in groups of 8 to create a small quilt of a person while working monochromatically and applying our skills with contrast and scale. You may recall we did this activity in another quilting group awhile back, but with purple fabric scraps and trims that time. Here's the link for that gathering. 


We began with a square of batting in front of us. Working in rounds and with a timer, we cut and layered the required elements, starting with the background and moving to the head, neck, shoulders, facial features and hair. The pile of fabrics in the middle of the table were for all to use. And the twist was that when the timer rang, we had to pass the piece to the person on our left.


Once all of the elements were added, the piece that landed in front of us is the one we took home to finish. We could add embellishments and stitch the whole thing down, and then bring our completed quilt back for show-and-tell. It was great fun. 


 Here is Freddy once he made the rounds and got pinned together to travel home. I reshaped a few elements and added fabric to create some contrast with his ears. If you compare this photo to the finished Freddy, you'll notice that he also got eyelids, cheeks and a nose job. And a story. This was great fun and the LeRouge Family grew in great numbers that day!


This is Freddy's Aunty Flora. She's quite a fashion plate. Love her earrings.


The Sharp Dressed Man might be interested in meeting Aunty Flora!

Sunday, October 13, 2019

A Little Heap 'O History...


Oh, it might not look like much now, but just wait! This sweet Dresden Plate quilt top was a freebie offered at our Florida Quilt Study Group meeting held at Miss D's Quilt Shop in Palatka. I love the Dresden Plate pattern, so I knew this uniquely made one had to come home with me. It's rough and could use a bath, but I have plans for it.


While quilters love to debate whether to clean an antique quilt or not, I'm always ready to risk giving them a bath. Noted quilt appraiser and quilt historian Brenda Grampsas was at our meeting to present her Rubba Dub Dub! lecture on how to clean and brighten old quilts safely and economically. She had a laundry basket of tips and tricks along with recipes for making our own cleaning products. Very helpful info! And Brenda is the donor of my quilt top, so her expertise will help me bring new life to it.


She and our leader, quilt historian and collector Kathy Metalica Cray, showed some quilts that Brenda had worked her magic on, and the results were impressive. This applique wreath quilt had one stubborn stain (upper left) that would not disappear, but it was considerably lightened, while others were removed. The quilt on the table belongs to member Debra Johnston who displayed it as part of Brenda's lecture. Debra followed Brenda's tips and her Courthouse Steps quilt looks freshened up and way cleaner than it was.


And this Dresden Plate quilt was one of a pair that Brenda cleaned and brightened with no ill effects on the old textiles. Lovely!


Here we are- some of the members of Florida Quilt Study Group. Vintage quilt fans, one and all. Photo credit to Brenda's husband John Grampsas. Well done getting a large group all in the photo!


While walking to the quilt shop from my parking spot, I saw this interesting mural and recognized the depiction of Billy Graham. I walked over to read the info badge at the side to find out his connection to Palatka and Putnam County. There was a scan icon to use with a phone camera, which I did. It took me to a site with a narrator who explained his time spent in the early years in the area. So interesting, and this is just one of many murals on buildings throughout the city. I'll visit more of them on upcoming meeting dates. A location map is provided at the website, too.


I enjoyed my lunch in the park along the beautiful St. John's River that served as an historically important transportation "highway" as well as recreational boating and fishing destination. What an enjoyable and history-filled day!


Sunday, October 6, 2019

From The Back Shelf...


Finally and at last! This table runner has languished in the "unfinished project area" of the sewing room for a long time. I've always liked it, but didn't really have a plan for it. When I needed a thank-you gift for someone, I decided to finish and present it to them. A plan! That's how it is with a lot of my ongoing projects- they wait, and wait, and wait a little longer. Eventually they find their way to completion. So I'm not too hard on myself for having lots of projects in the works.


This one was so old that I had to have a quilting friend remind me of some of the details. We took a fusible applique class on a quilting cruise. And it's old enough that we hand cut all those fussy pieces. Die cutters were not yet trending when we did the project. So that's a lot of cutting! Longarmer Debra Johnston quilted it after I free-motion stitched all the edges of the design elements to prevent fraying. That's a lot of stitching!


And I received a gift from quilting friend Joanne Nolt who made this handy cross-body bag. I love the colors, and it's just the right size to carry what I need.


The back view shows the outside pocket, which is also convenient. I love these colors- did I mention that already? I recognized the Jane Sassaman fabric print she used. It's a favorite and I even have some of this in another color.


And yet another gift, this one from my daughter Joanna. It's "The Thinker". She makes me smile when I glance at her. She's an air plant that needs very little care- just a sunny window and a spritz of water from time to time. If you look closely in the photo at the upper left, you'll see Frosty the horse happily grazing in his paddock.


Thursday, September 19, 2019

Must. Keep. Making...


   One project isn't even done before I begin another! Does that happen to you? This "Dancing Squares" baby quilt has been in process since last Spring when our guild had a lecture presented by Lynn Hagmeier. Her patterns from Kansas Troubles Quilters feature a technique she calls layered patchwork. It's an easy-to-sew method. This quilt looks like it's trapezoidal, doesn't it? Try as I might, I was unable to get a straight on photo of it. It's actually in square. Better photo and hanging skills would benefit here!


   In Lynn's method, pre-cut fabrics with pinked edges are used. In this case, it's 10" Layer Cake squares, 5" Charm squares, and 2 1/2" Mini Charms or squares cut from a Jelly Roll. Stack 'em and stitch 'em- that's the easy sewing method, so it really is a quick quilt (despite my taking a long time to finish it.) Longarm quilter Debra Johnston did the quilting. You can see the pretty swirl pattern and the pink thread she used on the back, shown in the next photo behind the pouch. This quilt will be going to a grand-niece, Nola Dawn. Isn't that a pretty name?


   Did I show you this already? I lose track, but it was such fun to make that it can't hurt to show it again in case I didn't, or you missed it. Jenny Doan of Missouri Star Quilts showed how to convert a candy bag into a cute zipper pouch using iron-on vinyl, a bit of fabric, and a zipper. Fun, fun.


   Our Fiber Art Bee had a fun workshop on making bird blocks from simple shapes. I used pre-fused scraps from my bin to make Mama and Baby Bird. There are decorator fabrics in the block along with cottons. I added some hand embroidery as Mama quizzes Baby on the basics of bird life. There may be more embellishment once the block is incorporated into a project.


   All of this sewing just exhausts Iggy. He's the little Silver Tuxedo rescue who's been with us for a 
year plus now. He knows how to relax!


Tuesday, September 3, 2019

Meanwhile in Other News...


Our local art museum- The Appleton Museum- held a journal making class recently. It was titled "Up-cycled Junk Journal," and we began by choosing a discarded art book to alter into a journal. All of the materials were supplied for us, though I used my ample stash of trims and  embellishments to finish the journal at home. The map canvas-fabric I chose for the cover base was a popular selection among the students. It's quite unique.


Rolls of this sticky-back pattern paper were perfect for the inside covers. It was almost like Contact Paper, but not as gummy and unmanageable. 


I think every journal deserves its own jewelry, so I made this charm which I'll add to the spine eventually. I tried to echo the colors from the map fabric in it.


Here's my work station at the museum's classroom. We used PVA glue spread with a craft stick to adhere the fabric to the discarded book.


My neighbor at the work table also chose the map fabric. But look at the photo frame she painted to add to the cover. It will create a shadow box in which she can create a 3-D focal piece. Clever idea!


Our instructor had the space well organized and supplied for everything we needed for journal making. You can see a few sample journals she shared on the front table.


What will happen inside the journal remains to be seen. But we were given some beautiful art auction magazines to harvest for images. I'm enjoying just looking through them for now. The fashion one has some wonderful women's "society portraits". I'm sure these will be very lovely and useful in upcoming journals.