Powered By Blogger

Friday, July 19, 2019

Ice-Dyeing: The Main Event...


Well, I needn't have worried about the Palomino Gold dye color being too orange to work with the blues- it's actually quite pretty. Though it looks different in nearly every area it appears, ranging in color from apricot to yellow-gold. This is a tee-shirt back that  received all of the dye colors.


And this is a piece of the PFD cotton fabric folded to form a mandala style radiating design.


A long rectangle of cotton shows the bands of color that were applied over the ice.


I did lots of odds and ends of fabrics in this ice-dye batch, and included a couple of squares of cotton I received in a fabric exchange. They were printed and hand-stamped with paint. This one now has an added layer of color from the ice-dyeing.


Here's the second square of hand-stamped fabric from the exchange. This one began as a white-on-white fabric print. The floral print acted as a resist to the dye, so the white flowers became more evident once the fabric was dyed. I'm happy with how these turned out.


One other item that's been waiting in the sewing room to get used somehow is this once-white silk ribbon. It took the dyes very nicely. I've already used it as an embellishment, and I'll show you this project in another post. It's not quite finished.


The shirt front took a lot of the Palomino Gold color, including those two blooming "things" seen at the bottom. I think I'll look better walking away as the back is the prettier side.


Just for reference, I'll include this photo of the dye application "before". It's so interesting how different the colors look once the dyeing is complete. If you're interested in knowing more about ice dyeing, Lynda Heines has a very good online class called Icy Delights. She offers so much authoritative information on amounts of dye to use, effective color combinations, tools and supplies, and lots more. Plus she has a dedicated Facebook page for added inspiration from her work and that of her students.


Thursday, July 11, 2019

Ice-Dyeing: The Prelude....


It looks good enough to eat, right? Sort of like clunky Shave Ice. But no, it's my latest round of ice-dyeing. After dyeing with my friend on my recent visit to Pennsylvania, I decided there were some odds and ends of fabrics in the sewing room that also needed to meet up with more color.


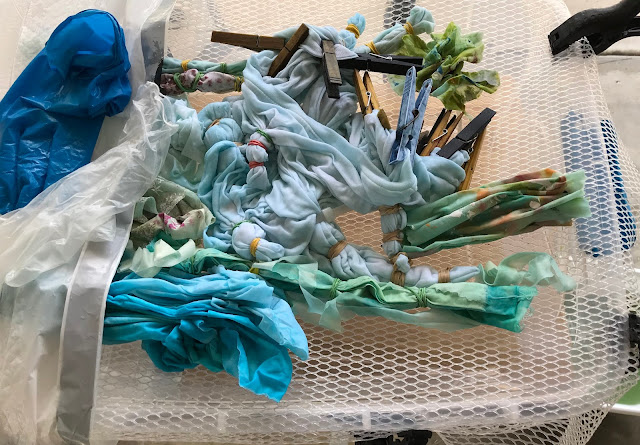
After soaking the fabrics in soda ash solution to make them receptive to the dyes, I squeezed out the excess solution, and scrunched and folded the fabrics. Some had resists like rubber bands and clothes pins added. Then I placed them on plastic mesh stretched and clamped over top of a storage tote. A plastic garbage bag is poised to slide up and over the ice and fabric.


The dyes were mixed (safety note: I was wearing a mask and gloves while handling them) and poured into squeeze bottles ready to apply over the ice. The fun thing about ice-dyeing is how unpredictable it can be. I've got three colors- Mermaid Dream, Palomino Gold, and Kingfisher Blue. The dye powder is concentrated and looks very dark, so it's impossible to tell what they will look like on the fabric, or how they'll blend together. Some dyes even fragment into their component colors, so there can be traces of colors you'd never expect to see.


I bought a 10-pound bag of ice, and used almost all of it to cover the fabric pieces. Now that fabric pieces are under the ice, it's even more of a surprise as to where the dye colors will wind up. As you can see in the first photo, I applied the liquid dye solution in bands across the ice. Now the whole shebang is covered with the plastic bag to "batch" for 24 hours- no peeking. I will say that when rinsing out the dye bottles, the Palomino Gold looked way more rusty-orange than I anticipated. So I'm a little concerned that using it with blue may be a regrettable choice. I was expecting it to be more yellow. I'll show you the results anyway. If they're not good, we'll all learn something! So we wait. 


Meantime, I can share some of the results from our Pennsylvania dyeing day. It amazes me how differently the pieces turn out based on how they are folded, where they were positioned when the dye was applied, and how much of a resist was used. All of these examples are PFD (prepared for dyeing) cotton done with the same three colors. In this case, the colors are Forest Green, Celadon, and Kingfisher Blue (all from Dharma Trading). 


Same dye colors, but look at the difference in intensity.


And this one- did I mention gray? No. That's because we didn't use any. And yet one of the dyes must have had gray as a component because here it is.


And this- Forest Green apparently has some yellow as a component. Some dyes are sold as pure colors and will not fragment into other colors. We didn't use any of them. The oohing and ahhing as each piece is revealed is part of the fun of ice-dyeing. I hope we'll be oohing and ahhing over my current batch. That Palomino Gold has me worried. Stay tuned!


Monday, July 1, 2019

Hurrah for The Red, White, and Blue...


Here's a button stack necklace I made just in time for our nation's birthday celebration on the 4th. I've been sidelined for much of June with an unanticipated health challenge, so the blog has been quiet. I'm using my time "out of the loop" to sort, reorganize, and cull the supplies in my sewing room. It doesn't look much better, but things are labeled and stored in a more manageable way.


Just before things took a turn health-wise, I was able to visit a quilting friend in Pennsylvania- a very beautiful section of our country. This is the view of The Endless Mountains of Northeast Pennsylvania taken from her deck. The air was crisp and fresh, and the greens so lush. It was a treat to see the deer and birds that visited her yard. Very refreshing after Florida's heat of early summer.


While there, we had our own 4-day fiber art retreat in which we did ice-dyeing of fabrics and gelli printing. I also got to go through her stash and assembled this necklace for her birthday. I brought it home to complete and will mail it to her soon.


And why make one necklace when you can make more? So this is hers, too. I showed her how to make the puffed yo yo and the beaded yo yo, and added some other charms to round this piece out. It's ready to travel back to Pennsylvania soon.

Happy 4th of July!

Sunday, June 9, 2019

Button Busting Fun...


Here's my latest (and current favorite) necklace made in a class I took with Goatfeathers Studio. It combines pretty buttons, beads, and charms. The ribbon closure makes it a little more comfortable on the neck, because these pieces are on the heavier side as you can imagine.


As if there are not already enough buttons in my sewing room, we had the opportunity to belly up to the button bar and choose a colorway we wanted to work with. Doesn't this look like the proverbial "candy shop"? We students were as gleeful as if it was candy!


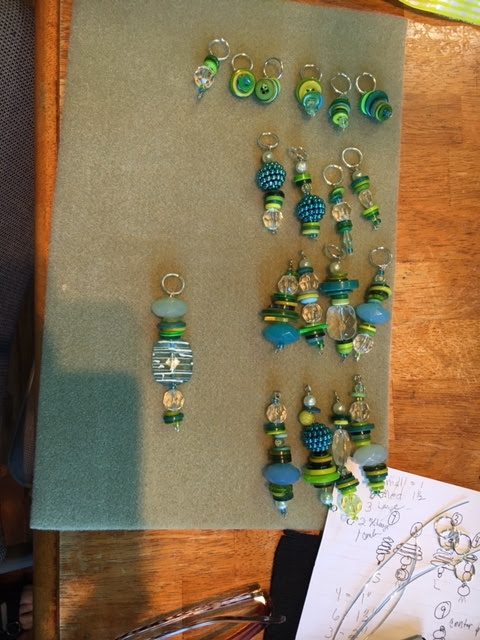
With selections made, we got to work (if you can call this kind of play work!) making an assortment of stacked button charms in various lengths.


Barely controlled chaos reigned for the next couple of hours as you can see from our work table.


Our instructors provided plenty of guidance and lots of examples of the charm possibilities.


And here's a sneak peek of my next favorite necklace! I love the golden butterscotch look of this one. And I found some Tiger's Eye style beads to include with it. It's hard to stop making these. I can't stay out of the bead aisle at the local craft shops. And my button jar will never be the same!


Saturday, May 25, 2019

It's a Lollapalooza!


     Oh, my! I suddenly realized that May is nearly over with, and I haven't posted anything in a long time. It isn't that I've been doing nothing, just that I haven't slowed down enough to take photos and share the projects. We also did some traveling during the month, so the time seemed to fly by.

     But I did complete this quilt which I titled "Lollapalooza!". I was drawn to the design because of  the inter-woven look and the use of large pieces of fabric which showcase the prints. I was gifted several of the fabrics in the quilt, and had a few more in my stash to complete it. The pattern is a downloadable PDF called The Libby Quilt from Kitchen Table Quilting. Fun to make and pretty quick, too. Mine was quilted by Debra Johnston, longarm quilter at The Old Sewing Machine Man.

     Our quilt guild, The Country Road Quilters, has a fun activity involving UFO projects and encouraging us to complete them. We listed 5 projects that are in various stages of completion-anything from only having fabric purchased and waiting to a quilt just in need of binding. Every other month, a number from 1 to 5 is drawn at a guild meeting, and that is the project from our list that is due two months hence. The participation has been wonderful, and quilters are getting their projects done! Myself included.

   June is coming up and I hope to share a couple more quilting and crafting projects... like a fun ice-dye day.


Sunday, April 28, 2019

Curtain Up on Magazine Makeovers...


I've discovered another fun and creative outlet using magazine images- mostly fashion magazines which are inexpensive and easy to find at our library used book shop. My interest began with some of the many images created by artist Alisa Burke. You can see a short video of her methods here on her YouTube channel. I was very intrigued so I enrolled her in mini-course Magazine Makeover to learn more. It's a simple concept of "adding to" appealing images cut from magazines like the one above. Acrylic paint, paint pens, and pens are the readily available tools. The lyrics from "Everything's Coming Up Roses" popped to mind when I started working on this image.


Doodles and drawings done in black Sharpie markers and white Signo Uniball pen added pizzazz to this romantic image. It's very relaxing to sit with pen in hand and just let the patterns flow. The images are glued to cardstock to give them stability. And in a few cases, I added clear gesso over the image to take the paint better.


Originally appearing in shades of gray and black, I added lines, marks, and flower doodles with a white pen. It's basically a matter of filling the space with pattern. Once I was done with several of the images, it dawned on me to take before and after photos to record the changes. So that was a lesson learned! 


It's not ALL black and white however. Bold splashes of bright colors create the background here. And it's easy to paint out elements that distract from the focal point. I'll add more to this one eventually. Alisa Burke keeps her images in a journal, but I've been working with them as loose pages so far. Eventually I hope to bind them together.


The images are just the right place to add journaling as well, and it becomes part of the pattern. I'm a note-taker while reading non-fiction books, and I thought magazine makeover pages would be a good place to record some of the ideas I want to remember.


Any white space or built-in lines are a good spot to add journaling. I happened to find a similar advertisement using the same model and elements to give you an idea of a "before".


I was glad to find this because I liked using the lines for writing. Now I have another one to work on.


If you watch Alisa's video linked above, you'll see that she is way more adventurous than I've been so far. She alters the models faces and features, paints over their hair and uses lots more patterns. I'm sure I'll get there eventually, but in the meantime, I'm enjoying using my pens and paints in this new way.


It's also fun to prepare the images for altering. A piece of direct mail included some gorgeous photographs of architectural details and furnishings. I flipped the brilliant chandelier upside down and used it as a backdrop for the sunglass model. I like it as it is, but will definitely be adding to it eventually. I have a nice stack of images and collages just waiting for my creative makeover.


This is another one of them. Again, it's pretty as it is, I think. The night sky, the elegant woman on the sofa- but it's ready for something more.If you'd like to see more of these fun images, visit fellow blogger Lynette Collis at All of Me blog- she's got some beauties there along with a link to her face journal of altered images. She took Alisa's class as well. This is a great way to re-purpose magazine images. I look at them differently now, and some of them are just too pretty to throw away!


Monday, April 1, 2019

Makers Gotta' Make...


"What are you going to do with that?" You've probably fielded this question at some point in your creative sewing, painting, journaling, or crafting efforts. I'm pretty sure I've tried to answer it myself a number of times along the way. It could be asked regarding my latest interest- that of making boho beads. Boho is short for bohemian, and the design characterized by a unique and free-spirited feel. These tiny creations crafted from fabric, beads, metallic threads, yarn bits, and wire are just flat out fun to make.


 I could feel badly about making things that have no specific use, but nope- I don't. I saw a quote in Deryn Mentock's Jewelry Maker's Design Book (pictured below). It really summed up my thinking on the subject of giving in to the creative urge without an end use in mind. She said, "..a maker-of-things can't give up making things." So it's really more about the process than the product.


And on and on it goes. Just as with journal making and quilting, while working on one project, six others are taking shape in my head!


Most of these beads are ones I've made, but several contain components that I received in a handmade bead swap. I just "tarted them up" a bit more with additional charms, beads and dangling things.


And I did make use of one of my boho beads. I added it to the latest charm necklace. It looks right at home there with the button, thimble, and yo-yo charms. And I do plan to add some of the beads above to the spine of a journal or two. That is, when I pause for awhile in making the beads!


Here's the cover of the design book I borrowed from the library. And if you'd like to see how to make the boho beads, there are lots of good tutorials on YouTube. Here is one of them.