Powered By Blogger

Thursday, July 21, 2016

So How's Your Summer?


I hope you are having a good one! It certainly seems to be flying by quickly. Mine has turned out to be a surprise in that I discovered something about myself. I'm completely enamored with online classes! I love how affordable they are, and how I can complete them at my own pace and in my own time. And I love learning new things. Hopefully I've not overwhelmed myself, but I signed up for several summer courses. This "Go With the Flow" girl is just one example. She's a lesson by Marieke Blokland from the Art Journal Summer School 2016 series of classes. We get two new lessons every week until September.
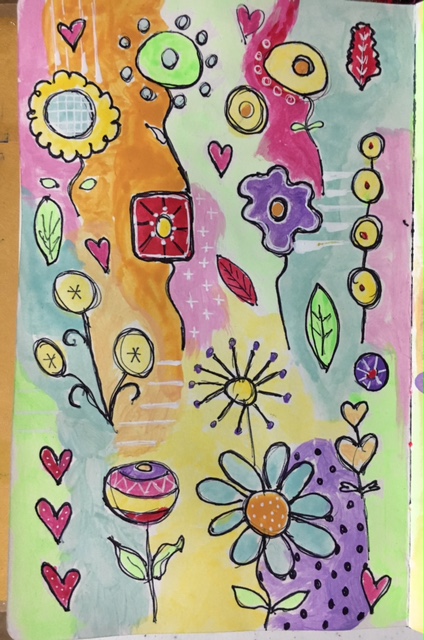


The lessons are beginner-friendly which is exactly what I need. Far from an art class star in my school days, I never thought I'd be interested in or show any aptitude at all for painting and mixed media. And yet, here I am, enjoying every lesson and doing my best to master the current skill. This lesson was taught by artist Kate Crane and was quite relaxing to complete. 


I've also made several of these paper flowers as wall adornments, using old calendar pages and scrapbook paper. These are the brainchild of Jenniebellie who will be one of the teachers this summer. She also has a YouTube channel on which she demonstrates all sorts of mixed media and journaling projects, including these flowers.


One thing I find about branching out into mixed media journaling in addition to quilting is the explosion of supplies in the workroom. Paper, stitch, painting- they all have their own specialized supplies. Why not combine them all? Well, that is another course, of course! This one is taught by Joanne Sharpe and is based on her latest book shown above. The class is titled Paint, Stitch, Play and explores all kinds of paints and markers on fabric. The muslin booklet, also shown above, will contain a catalog of the various paints I have on hand along with some class projects. One of our first exercises was to make the booklet and to practice free-motion stitch-doodling as shown in the sample below.


So I've stayed quite entertained with practicing all the new products and techniques I'm learning. Summer fun, indeed!


Sunday, July 3, 2016

Tons of Tees, Tons of Ideas...


Perhaps my favorite fiber art technique we explored at a recent Fiber Art Bee retreat is discharge dyeing. We accomplished it using a spray solution of 1 part chlorine bleach with two parts water. We worked outdoors on plastic covered tables and had buckets of water handy for immersing the projects to stop the bleaching. This star shirt is one I made after the workshop to wear to the 4th of July parade. I cut assorted sizes of stars from freezer paper and then ironed them in place on the red shirt. I watched the change happen right before my eyes as the areas where I sprayed faded to a dusty pink.


But this shirt is my favorite. I ironed freezer paper hearts around the neckline and a large vase of flowers to the front. A strip of lace trim placed across the bottom created the lacey look there. The fun of this technique is that you don't know just what color you'll get. I like the rusty orange that this black tee turned in the sprayed areas. I ran the pieces through the rinse cycle of the washing machine to remove excess bleach and stop the discharge.


This shirt was one of the samples made by our instructors at the workshop held at Goatfeathers Studio. This black tee turned a khaki color which made the masked shapes quite distinct.


We also discharge dyed pieces of fabric. The die-cut leaves cut from freezer paper created very distinct images. And the piece at the bottom is my experimental piece using the lace as a mask. This one was done on navy cotton. Cotton is the key word here. I tried discharge dyeing a black craft apron, but the apron was made from a blend and the image was indistinct.


Not every piece was a success. I'd read that using cheesecloth as a mask would make a soft imprint. Perhaps I spread it too thin on this piece of brown cotton, but nearly all the brown disappeared and the result was rather unappealing. 


Here are some of our discharge dyed pieces drying on a fence. In addition to bleach spray, we also worked with a bleach pen and bleach crystals. I've got a purple shirt ready to discharge and a couple more black ones. This method is a keeper! 


Thursday, June 23, 2016

Blowin' in the Wind...


Koinobori and Kumihimo... say those two words fast! It just happened that I'm working on these two Japanese crafts, both of which are new to me. The first- Koinobori- is a type of wind sock known as "carp streamers." The wind socks are the symbol of an annual Japanese Children's Day. They're flown on the spring holiday to express hope for health and strength for children. This Koinobori was a project we made during a Fiber Art Bee workshop held recently. The Goat Girls from Goatfeathers Studio taught us to use a glue resist technique to make fanciful designs on cotton fabric, let the glue dry, and then paint the fish with acrylic paints.


Once dry, we washed out the glue, stitched the sides and tail, and added hanging apparatus. The Koinobori are suspended from a swivel hook so they move freely in the breeze. I hung mine in a grove of trees and then had a hard time getting a photo of it at rest- it moves almost constantly.


You can just see the faint blue lines of the Elmer's Gel Glue on the cotton shape in the photo above. We placed the wet piece on freezer paper, and set it out to "fry" in the sunny driveway, weighted by wood pieces so the projects did not become airborne too soon. 


These sample projects greeted us as we entered the studio. The smallest turquoise one at the lower right was made from a toilet paper roll and colorful tissue paper. Our projects were smaller than the fabric examples here so that we could get them completed in the time allotted. We learned two other techniques during our full-day workshop, and I'll share those in another post. I'm happy to have my Koinbori finished and flying in the breeze. It's a happy sight out in the grove.


The second craft I learned is Kumihimo- the Japanese art of braiding decorative cords. I had seen a demo on this at a quilt show some years ago and found it intriguing. But it's only recently that I gave it a try. You can see some sample cords I made using yarn and nylon at the lower left. The round foam disc is the loom on which the braid is created. What convinced me to try this craft was a kit by Primitive Originals Kumihimo I purchased at another quilt show- it contained the beautiful stainless steel cross and the cord to make the necklace. The instructions were clear and the project was pretty easy. My next challenge will be to add beads and make an even more decorative cord.


The grove behind our home is several degrees cooler than the yard, and has lots of vegetation that needs to be tamed from time to time. It's the place where I hang prayer flags and other fiber projects like the wind sock. This grouping of prayer flags is titled "Tribute to Big Mother". You can see close-up photos of the flags here.  The grove also has this pretty flowering tree which I thought was called a rain tree, but a web search shows is a mimosa. While beautiful and delicate, the mimosa is considered an invasive plant in Florida and can cause some landscaping problems. So it may have to go at some point.


But meanwhile our little rescue dog Abby loves her free time in the grove. She has a fenced yard to keep her safe, but she is allowed some time on the loose each day. She's very good about heading out to "her" grove where she plays happily with her yellow toy. You may be able to see it on the ground in front of her. Abby has some unusual "quirks" and one of them is that she's unable to have many toys as she can destroy them in a matter of minutes (she's also a hoarder, carrying off items to her crate or bed). Soft toys are out, and she would so love to have one. But I've found a dog toy called "Goughnuts" that she cannot destroy. She has several of these and can chase, fetch, and roughhouse with them to her heart's content. Abby has gained in health and in good behavior. I'm glad to say she's come a very long way!


Monday, May 30, 2016

Pretty Things...


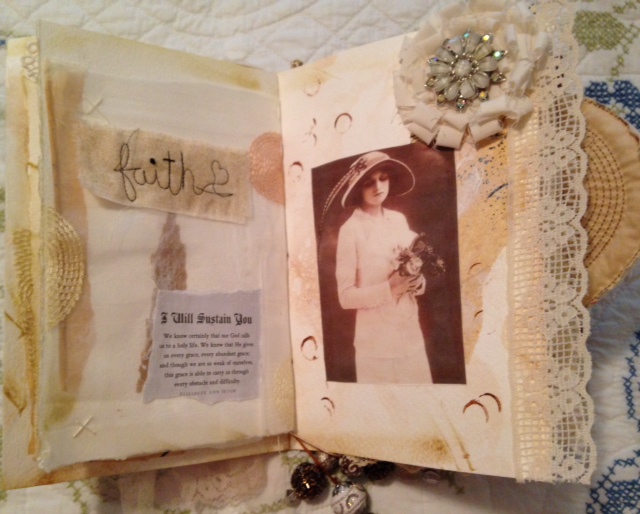
An old Reader's Digest book became an altered journal on my recent quilting retreat last month. Following instructions in a DVD by Nellie Wortman, I combined lace, fabric, paper, beads, inks and more to make this shabby-chic project. As Nellie notes in her class, the book makes viewers want to open it and investigate all that lovely goodness peaking out of the sides and bottom. The cover itself is layered with corrugated cardboard, packing papers, and a transparency stitched to frayed muslin and trimmed with lace and flowers.


Even the spine became decorative with gathered fabric and pearls. And the fancy glass beads accent the binding thread. Almost anything goes in making these books, and it's very freeing and fun to think of ways to combine materials in a pleasing way.


I love vintage images of ladies in hats. This one is printed on cotton and covered with sheer curtain fabric. My version of the project is a faith journal, and I had a book of quotes to add to the pages. This one says, "Be strong and let our hearts take courage, all you who hope in the Lord." - Psalm 31: 24.


Each of the pages is made from watercolor paper and distressed with ink, applied tissue and other papers, and pen. This quote says, "Oh! Teach us to live well! Teach us to live wisely and well!" - Psalm 90: 12


 An old brooch centered on a folded flower made from muslin strips accents these pages. I also got some practice free-motion writing, using the machine needle as a pen. Another vintage photo of a woman in a wonderful hat. And a quote from Elizabeth Ann Seton- "I Will Sustain You".


Ruth Rae wrote an article in Somerset Sew, Winter 2011, in which she outlined ways to make "Scrap Cards" using bits and pieces of materials. I employed her idea to make small fabric vignettes which I then glued to several of the pages. These were a lot of creative fun, and once started, the ideas just flowed for combining things like clothing labels, cheesecloth, and machine and hand stitches.


For this image, I stitched a transparency of palm trees to a rectangle of fabric paper that is just full of texture.


And this is another Ruth Rae-inspired scrap card. Laces, ribbon, and words all stitched to a background of sheet music and then glued to the journal page.


 At last- a home for this hand stitched heart. I picked it up off the freebie table at our guild many years ago. I'd come across it every now and again and ask myself, "What am I ever going to do with this?" I came close to purging it from the stash, but I'm so glad I just couldn't do it. It's just right in this book.  One other quote I added to the book has a great reminder- it says, "The future lies before you like a field of driven snow. Be careful how you tread it, for every step will show." I'm sure there will be another of these books in my project plans. It was so satisfying to make, and it makes me want to pick it up and investigate it almost daily!


Speaking of pretty things, Jack and I came across this lovely shop while bike riding in Cedar Key, Florida last week. It's called Island Thyme Antiques. Doesn't Leslie the proprietor have a creative flair for display? Her shop carries all sorts of coastal gifts, antiques, and jewelry.


And there are nautical-themed prints galore. Worth a visit!


Friday, May 20, 2016

It's Twins!


My goodness, I'm not sure what happened, but I've not posted on the blog in more than a month! It's not because I'm not sewing or crafting though. Just life happening day by day I guess. Anyway, these two quilts got their start in an "orphan block" exchange at our Country Roads Quilters group. Members brought in blocks and projects they'd started but had no desire to complete. The projects were heaped on tables and we were allowed to "shop" in order to choose one or more projects we wanted to complete. The blocks for this Drunkard's Path quilt caught my eye right away, so I adopted them. Some blocks were pieced already, while the parts to sew others were in the bag. I just had to finish some blocks, and then assemble the quilt. The interesting part of the story is that these blocks were pieced by The Old Sewing Machine Man, Johnny Johnston. His wife Debra brought them to the swap. But there's more to the story.


About three years ago, the guild held the same swap activity and I got these Drunkard's Path blocks as well. These were pieced by Debra herself and given up for the orphan block swap. Again, I just had to piece some more blocks and then assemble them into the quilt. This quilt was underway when I spotted her husband's blocks and felt the draw to complete them both. I began to refer to these two quilts as "The Johnston Family Twins." Once I finished the tops, both went back to Debra for long-arm quilting. Then back to me for binding. We had the big reveal at a recent meeting, so both Debra and I presented these quilts. They will be donation quilts, but I'd kind of like to keep them together if possible, so we're not yet sure where they will go. But it was fun to complete the two projects that were started by a married couple.


Here's a close-up of the swirl pattern Debra chose to complement both quilts. And below is a photo of the backs where I pieced in the extra blocks from each project. Isn't that little pin doll cute? I bought her years ago at a quilt show and she goes on every quilt retreat and works hard to help out around the sewing room. She'll photo-bomb pictures every now and then, so you'll see her pretty face again.


One thing I did that kept me away from the blog was to take a trip for several days to Amelia Island, Florida, for a quilt retreat. A quilting friend from Pennsylvania joined me and we both enjoyed discovering this fascinating community. There is a wonderful art gallery with a large display inside, and even a decorative outside. The free-form mosaic designs cover the building and walls. I'll show photos of the projects we worked on in another post. The weather was lovely, and we thoroughly enjoyed the beach, the retreat, and the town. We also went on a river cruise that took us to Cumberland Island where we could see some of the wild horses that inhabit the island. It's worth a visit if you get to Florida! I'm thinking a return retreat is in order.


Saturday, April 2, 2016

Even More Little Things... Sunset ATCs


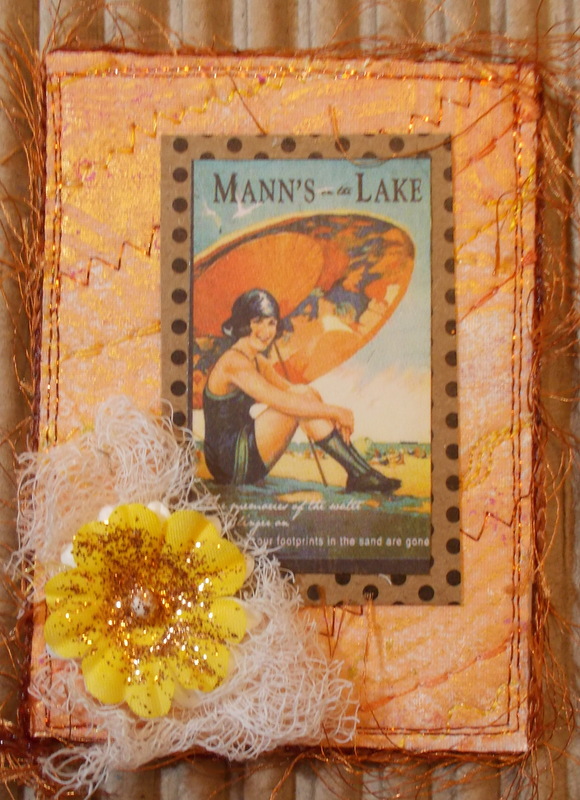
Lenna at Creative Swaps comes up with some fun ideas, and this one is no exception. Participants were asked to make 6 mixed media Artist Trading Cards (ATCs) to swap with others. We had a choice to make the 2 1/2" x 3 1/2" cards in either a "sunset" or "ocean" color theme. I chose Sunset, and began each piece with a Gelli-printed fabric background that I stitched with a variety of decorative machine stitches.


I love vintage style and found some images of swimmers or special summer beach locations like Coney Island, NY. 


Once I added the images, I just needed to plow through the many embellishments I've collected over time. This bathing beauty is accented with metallic buttons and a press-on sticker of a moth. 


A wisp of cheesecloth and a glittered flower were added to this lovely.


I'm not sure where Mann's Lake is located. The one option I found in a search was a reservoir in Idaho. I must say, Google is my friend- I often use it to answer questions, settle discussions, and learn new things! So handy.


Each sunset ATC is stitched around the edges and I applied some eyelash yarn to the edges for texture. The fusible Peltex product I chose gave the cards a nice feel and makes them rigid so they won't bend or crease. They are backed with scrapbook paper. As much fun as it is to make these little ATCs, it will be even more fun to receive back 6 cards made by other swap participants. I don't know what Lenna has up her sleeve for the next swap, but I'm sure it will be intriguing!


Monday, March 21, 2016

Little Things Mean a Lot...


And sometimes little things mean a lot of work! Often it's hard to appreciate all of the work we stitchers and crafters put into our tiny bits of art. This small brooch is an example. I did the stitching and assembling, but even before that, author Cheryl Lynch did the shrink art nest and crow. She packaged it all up and I won the kit on her blog some time ago. Finally, I finished it between other projects. The brooch was one of several featured in her book "Sew Embellished" which I also won. The book is full of information and ideas for unique embellishments for small projects.


Next are some vintage lace, paper, and trims combined into small "scrap cards" as described by Ruth Rae in her Somerset Sew Winter 2011 article. They are oddly satisfying little morsels of all the trims and embellishments we stitchers accumulate over time. These will go into a vintage-style journal that, so far, exists only in my mind's eye. But I'm getting closer!


Speaking of small things, I recently presented a quilt guild program on Journal Quilts. Our local Fiber Art Bee (FAB) is full of talented members who make these small works of art and generously loaned me their work to illustrate the points about journal quilts. Jodi Colvard's is shown above and includes everything metal- from the mesh and wire flowers to the metal beading.


And Miss Smarty is keeping secrets in her cardboard box. She's the whimsical creation of FAB leader Celeste Beck. Celeste and her sister Merri McKenzie also taught the prayer flag and banner class noted in the previous post.


They had samples galore, and inspired students to make banners in a variety of shapes and styles. One student developed her series of banners around an insect theme.


Some of the sample banners were creatively crafted from paper. This one had a very appealing crepe paper flower adorning it.


We were given pattern templates in the shapes above and encouraged to try painting, stamping, stencilng, or crafting a vintage look in our banners. My biggest challenge was to focus on one style because I wanted to dive into everything! Going small can sure be a lot of fun.