Powered By Blogger

Thursday, June 23, 2016

Blowin' in the Wind...


Koinobori and Kumihimo... say those two words fast! It just happened that I'm working on these two Japanese crafts, both of which are new to me. The first- Koinobori- is a type of wind sock known as "carp streamers." The wind socks are the symbol of an annual Japanese Children's Day. They're flown on the spring holiday to express hope for health and strength for children. This Koinobori was a project we made during a Fiber Art Bee workshop held recently. The Goat Girls from Goatfeathers Studio taught us to use a glue resist technique to make fanciful designs on cotton fabric, let the glue dry, and then paint the fish with acrylic paints.


Once dry, we washed out the glue, stitched the sides and tail, and added hanging apparatus. The Koinobori are suspended from a swivel hook so they move freely in the breeze. I hung mine in a grove of trees and then had a hard time getting a photo of it at rest- it moves almost constantly.


You can just see the faint blue lines of the Elmer's Gel Glue on the cotton shape in the photo above. We placed the wet piece on freezer paper, and set it out to "fry" in the sunny driveway, weighted by wood pieces so the projects did not become airborne too soon. 


These sample projects greeted us as we entered the studio. The smallest turquoise one at the lower right was made from a toilet paper roll and colorful tissue paper. Our projects were smaller than the fabric examples here so that we could get them completed in the time allotted. We learned two other techniques during our full-day workshop, and I'll share those in another post. I'm happy to have my Koinbori finished and flying in the breeze. It's a happy sight out in the grove.


The second craft I learned is Kumihimo- the Japanese art of braiding decorative cords. I had seen a demo on this at a quilt show some years ago and found it intriguing. But it's only recently that I gave it a try. You can see some sample cords I made using yarn and nylon at the lower left. The round foam disc is the loom on which the braid is created. What convinced me to try this craft was a kit by Primitive Originals Kumihimo I purchased at another quilt show- it contained the beautiful stainless steel cross and the cord to make the necklace. The instructions were clear and the project was pretty easy. My next challenge will be to add beads and make an even more decorative cord.


The grove behind our home is several degrees cooler than the yard, and has lots of vegetation that needs to be tamed from time to time. It's the place where I hang prayer flags and other fiber projects like the wind sock. This grouping of prayer flags is titled "Tribute to Big Mother". You can see close-up photos of the flags here.  The grove also has this pretty flowering tree which I thought was called a rain tree, but a web search shows is a mimosa. While beautiful and delicate, the mimosa is considered an invasive plant in Florida and can cause some landscaping problems. So it may have to go at some point.


But meanwhile our little rescue dog Abby loves her free time in the grove. She has a fenced yard to keep her safe, but she is allowed some time on the loose each day. She's very good about heading out to "her" grove where she plays happily with her yellow toy. You may be able to see it on the ground in front of her. Abby has some unusual "quirks" and one of them is that she's unable to have many toys as she can destroy them in a matter of minutes (she's also a hoarder, carrying off items to her crate or bed). Soft toys are out, and she would so love to have one. But I've found a dog toy called "Goughnuts" that she cannot destroy. She has several of these and can chase, fetch, and roughhouse with them to her heart's content. Abby has gained in health and in good behavior. I'm glad to say she's come a very long way!


Monday, May 30, 2016

Pretty Things...


An old Reader's Digest book became an altered journal on my recent quilting retreat last month. Following instructions in a DVD by Nellie Wortman, I combined lace, fabric, paper, beads, inks and more to make this shabby-chic project. As Nellie notes in her class, the book makes viewers want to open it and investigate all that lovely goodness peaking out of the sides and bottom. The cover itself is layered with corrugated cardboard, packing papers, and a transparency stitched to frayed muslin and trimmed with lace and flowers.


Even the spine became decorative with gathered fabric and pearls. And the fancy glass beads accent the binding thread. Almost anything goes in making these books, and it's very freeing and fun to think of ways to combine materials in a pleasing way.


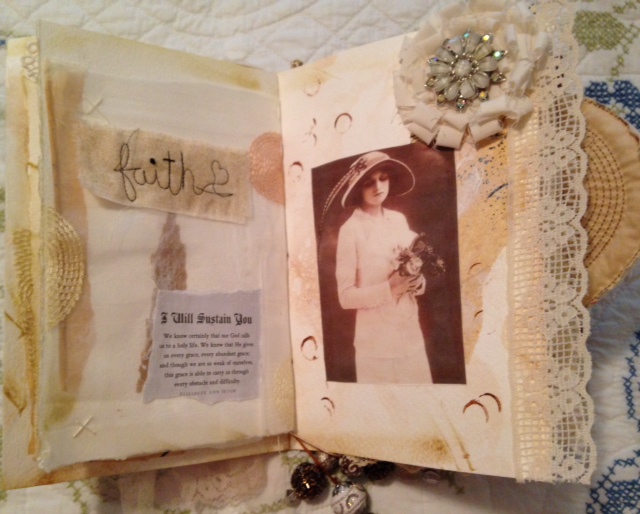
I love vintage images of ladies in hats. This one is printed on cotton and covered with sheer curtain fabric. My version of the project is a faith journal, and I had a book of quotes to add to the pages. This one says, "Be strong and let our hearts take courage, all you who hope in the Lord." - Psalm 31: 24.


Each of the pages is made from watercolor paper and distressed with ink, applied tissue and other papers, and pen. This quote says, "Oh! Teach us to live well! Teach us to live wisely and well!" - Psalm 90: 12


 An old brooch centered on a folded flower made from muslin strips accents these pages. I also got some practice free-motion writing, using the machine needle as a pen. Another vintage photo of a woman in a wonderful hat. And a quote from Elizabeth Ann Seton- "I Will Sustain You".


Ruth Rae wrote an article in Somerset Sew, Winter 2011, in which she outlined ways to make "Scrap Cards" using bits and pieces of materials. I employed her idea to make small fabric vignettes which I then glued to several of the pages. These were a lot of creative fun, and once started, the ideas just flowed for combining things like clothing labels, cheesecloth, and machine and hand stitches.


For this image, I stitched a transparency of palm trees to a rectangle of fabric paper that is just full of texture.


And this is another Ruth Rae-inspired scrap card. Laces, ribbon, and words all stitched to a background of sheet music and then glued to the journal page.


 At last- a home for this hand stitched heart. I picked it up off the freebie table at our guild many years ago. I'd come across it every now and again and ask myself, "What am I ever going to do with this?" I came close to purging it from the stash, but I'm so glad I just couldn't do it. It's just right in this book.  One other quote I added to the book has a great reminder- it says, "The future lies before you like a field of driven snow. Be careful how you tread it, for every step will show." I'm sure there will be another of these books in my project plans. It was so satisfying to make, and it makes me want to pick it up and investigate it almost daily!


Speaking of pretty things, Jack and I came across this lovely shop while bike riding in Cedar Key, Florida last week. It's called Island Thyme Antiques. Doesn't Leslie the proprietor have a creative flair for display? Her shop carries all sorts of coastal gifts, antiques, and jewelry.


And there are nautical-themed prints galore. Worth a visit!


Friday, May 20, 2016

It's Twins!


My goodness, I'm not sure what happened, but I've not posted on the blog in more than a month! It's not because I'm not sewing or crafting though. Just life happening day by day I guess. Anyway, these two quilts got their start in an "orphan block" exchange at our Country Roads Quilters group. Members brought in blocks and projects they'd started but had no desire to complete. The projects were heaped on tables and we were allowed to "shop" in order to choose one or more projects we wanted to complete. The blocks for this Drunkard's Path quilt caught my eye right away, so I adopted them. Some blocks were pieced already, while the parts to sew others were in the bag. I just had to finish some blocks, and then assemble the quilt. The interesting part of the story is that these blocks were pieced by The Old Sewing Machine Man, Johnny Johnston. His wife Debra brought them to the swap. But there's more to the story.


About three years ago, the guild held the same swap activity and I got these Drunkard's Path blocks as well. These were pieced by Debra herself and given up for the orphan block swap. Again, I just had to piece some more blocks and then assemble them into the quilt. This quilt was underway when I spotted her husband's blocks and felt the draw to complete them both. I began to refer to these two quilts as "The Johnston Family Twins." Once I finished the tops, both went back to Debra for long-arm quilting. Then back to me for binding. We had the big reveal at a recent meeting, so both Debra and I presented these quilts. They will be donation quilts, but I'd kind of like to keep them together if possible, so we're not yet sure where they will go. But it was fun to complete the two projects that were started by a married couple.


Here's a close-up of the swirl pattern Debra chose to complement both quilts. And below is a photo of the backs where I pieced in the extra blocks from each project. Isn't that little pin doll cute? I bought her years ago at a quilt show and she goes on every quilt retreat and works hard to help out around the sewing room. She'll photo-bomb pictures every now and then, so you'll see her pretty face again.


One thing I did that kept me away from the blog was to take a trip for several days to Amelia Island, Florida, for a quilt retreat. A quilting friend from Pennsylvania joined me and we both enjoyed discovering this fascinating community. There is a wonderful art gallery with a large display inside, and even a decorative outside. The free-form mosaic designs cover the building and walls. I'll show photos of the projects we worked on in another post. The weather was lovely, and we thoroughly enjoyed the beach, the retreat, and the town. We also went on a river cruise that took us to Cumberland Island where we could see some of the wild horses that inhabit the island. It's worth a visit if you get to Florida! I'm thinking a return retreat is in order.


Saturday, April 2, 2016

Even More Little Things... Sunset ATCs


Lenna at Creative Swaps comes up with some fun ideas, and this one is no exception. Participants were asked to make 6 mixed media Artist Trading Cards (ATCs) to swap with others. We had a choice to make the 2 1/2" x 3 1/2" cards in either a "sunset" or "ocean" color theme. I chose Sunset, and began each piece with a Gelli-printed fabric background that I stitched with a variety of decorative machine stitches.


I love vintage style and found some images of swimmers or special summer beach locations like Coney Island, NY. 


Once I added the images, I just needed to plow through the many embellishments I've collected over time. This bathing beauty is accented with metallic buttons and a press-on sticker of a moth. 


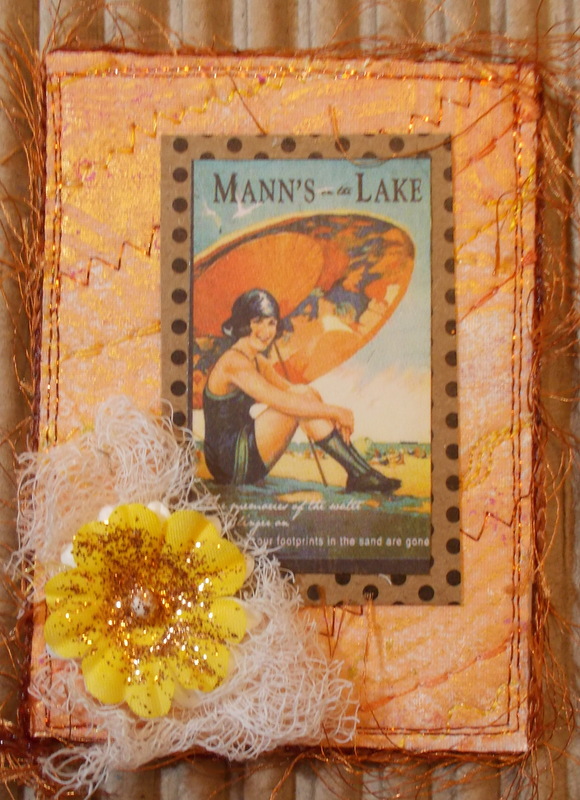
A wisp of cheesecloth and a glittered flower were added to this lovely.


I'm not sure where Mann's Lake is located. The one option I found in a search was a reservoir in Idaho. I must say, Google is my friend- I often use it to answer questions, settle discussions, and learn new things! So handy.


Each sunset ATC is stitched around the edges and I applied some eyelash yarn to the edges for texture. The fusible Peltex product I chose gave the cards a nice feel and makes them rigid so they won't bend or crease. They are backed with scrapbook paper. As much fun as it is to make these little ATCs, it will be even more fun to receive back 6 cards made by other swap participants. I don't know what Lenna has up her sleeve for the next swap, but I'm sure it will be intriguing!


Monday, March 21, 2016

Little Things Mean a Lot...


And sometimes little things mean a lot of work! Often it's hard to appreciate all of the work we stitchers and crafters put into our tiny bits of art. This small brooch is an example. I did the stitching and assembling, but even before that, author Cheryl Lynch did the shrink art nest and crow. She packaged it all up and I won the kit on her blog some time ago. Finally, I finished it between other projects. The brooch was one of several featured in her book "Sew Embellished" which I also won. The book is full of information and ideas for unique embellishments for small projects.


Next are some vintage lace, paper, and trims combined into small "scrap cards" as described by Ruth Rae in her Somerset Sew Winter 2011 article. They are oddly satisfying little morsels of all the trims and embellishments we stitchers accumulate over time. These will go into a vintage-style journal that, so far, exists only in my mind's eye. But I'm getting closer!


Speaking of small things, I recently presented a quilt guild program on Journal Quilts. Our local Fiber Art Bee (FAB) is full of talented members who make these small works of art and generously loaned me their work to illustrate the points about journal quilts. Jodi Colvard's is shown above and includes everything metal- from the mesh and wire flowers to the metal beading.


And Miss Smarty is keeping secrets in her cardboard box. She's the whimsical creation of FAB leader Celeste Beck. Celeste and her sister Merri McKenzie also taught the prayer flag and banner class noted in the previous post.


They had samples galore, and inspired students to make banners in a variety of shapes and styles. One student developed her series of banners around an insect theme.


Some of the sample banners were creatively crafted from paper. This one had a very appealing crepe paper flower adorning it.


We were given pattern templates in the shapes above and encouraged to try painting, stamping, stencilng, or crafting a vintage look in our banners. My biggest challenge was to focus on one style because I wanted to dive into everything! Going small can sure be a lot of fun.


Sunday, March 6, 2016

Tra La... It's Spring!


It's time to freshen up the garden with flags and banners! At a recent Fiber Art Bee meeting we brought old dresser scarves and other vintage linens and added to them with doodled and inked flowers. Sharpie pens and other fabric markers gave some spark to the pretty but rather dingy linens. I added a sleeve to the back and this is now ready to flutter in the spring breeze and sunshine. The garden needs a clean up first though.


Adding to the fun, I took a class on making banners at our guild's Quilt Camp. The teachers were Celeste and Merri, two sisters from Goatfeathers Studio. They generously shared stacks and bags full of vintage feedsacks and other linens from their family treasures. I was smitten with this pink/brown print feedsack and decided to incorporate it in the pennants for my project. I tried out their giant yo-yo maker for this one.


I call the project "Tribute to Big Mother." That was the name everyone called Celeste's and Merri's grandmother, whose fabric collection we used. She loved to sew, so I added the image of a vintage machine to another feedsack print. It's trimmed in pink glass leaves and seam binding along with a doily piece.


There wasn't enough time to complete the project in class so when I brought it home, I was able to look through my own supplies to find some go-with items like this heart cut from an old quilt piece and the coffee-dyed lace. Ruffles were my other repeating theme, so there's that feedsack again.


We were encouraged to try a woven background for one of our pennants. I added lace, pearls, and more ruffles.


A piece of vintage napkin plus the quilted heart, lace and ruffle combine in this pennant. I stamped some beige denim for one of the pieces. It was interesting to see how some of the students went in an arty direction with painting, stenciling, and stamping bright colors, while others dove into the shabby vintage style.


Here's the pennant displayed on a wall. It will go outside eventually, but must visit our show-and-tell session first. I'll show some of the class samples in my next post.


And one evening we visited downtown Ocala to see the Budweiser Clydesdales parade through the square. This driver handles an 8-horse hitch, and those massive horses were ready to go, feeling quite frisky in the cool air. It's quite a production, and we watched as the ride-along Dalmatian was handed up using his special harness. An impressive sight!


Thursday, February 18, 2016

Toss a Tee? Can't Do It...


My favorite tee-shirts are one I buy from Beall's Florida. They are very soft, wash and wear nicely, and have some lovely images with a touch of bling. I've also gotten some nice ones in cruise ship gift shops.


This parrot image I liked so much, I bought two tees, knowing the first one would wear out or I'd spill coffee on it. So now there's one in the quilt and one to wear. But after the tees are worn to near oblivion, I carefully cut out the image before tossing the shirt. Just can't bear to part with these images, so the question becomes "What do I do with them?"


The answer came in the form of a Craftsy online class titled "The Ultimate T-Shirt Quilt" with Winnie Fleming. She offers all the instruction and ideas you need to create a quilt using any size and style of tees. Her methods, formula, and grid system make designing a custom layout manageable. I just pulled a lot of scraps and fabrics from my stash and jumped right in. This quilt is the result, and it's soft and comfy.


So now, those tee shirt images are finally out of storage and my fabric stash has dwindled just a little. Here are a couple of the images included in the quilt. I mixed everything- whether Christmas or not. If it had bling and once graced a shirt, it went in the quilt.


Of course the question then became how to quilt the project which has so many different elements in it. That's where longarm quilting friend Katherine Wohler came in. We discussed and puzzled for awhile, and then she got started. She brought it to me when it was partly done, and we both felt the knit blocks needed a bit more quilting to secure them. However, the glitzy parts were a challenge in terms of breaking a needle and how to quilt around them.


So back home the quilt went with her. She was able to quilt right up to the images while using softer, meandering stitching throughout the rest of the quilt. This is the back of one block. She also found a lovely bronze-colored thread that blended all the colors nicely. The quilt took quite a bit of work to piece all the fillers and try out different layouts, so I may feel able to go ahead and toss any glitzy tees in the future. But you never know!