Powered By Blogger

Tuesday, June 15, 2021

BoHo Beads Galore-Part 1...


When it comes to making these pretty BoHo beads, you can see I was unable to stop at just one! Having recently done a Zoom presentation for a fiber group on making them, I thought I'd share the steps here in case you want to try it yourself. I bet you have the makings for these, or at least many of them, on hand! First off, let's start with the name. BoHo is a term that describes a free and unconventional style in fashion, home decor, art, and various crafts. The style became popular in the 1970s and it reflects Hippie and Bohemian influences that create a look with layers of color, texture, pattern, and trims. Sometimes the terms Gypsy and Bohemian are used interchangeably when describing the look. That's because of the Gypsy or Romany people who lived in the Bohemia region of the Czech Republic. They had a unique style of dress and were known for their vagabond wandering lifestyle. Artists and hippies felt like kindred spirits and so were referred to as Bohemian. Then in the early 2000s the term BoHo Chic was coined, and we've embraced it since.


So with the concise history lesson complete, let's see what you'll need to make your own BoHo beads. In the photo above, starting at the left: core material for your bead such as a recyled plastic straw; fabric glue such as Aleene's or Fabri-Tac; small strips of fabric or ribbon (in the basket at top); metallic threads and floss (upper right); jewelry wire in both heavy gauge such as 18 or 20 and finer gauge such as 26; and assorted threads, fibers and yarns to trim the beads (eyelash yarn works nicely).


Here are some examples of core material. Some makers use paper straws, but I find they get a little soggy, so prefer to recycle plastic straws. You can see the various diameters in the photo. I find the narrower the core, the less "play" there is in the finished bead. On the far right is a plastic lollipop stick (with a small hole) which is my current favorite core material. You can find them in the cake decorating area of a craft store, or on Etsy. I've even seen other fiber artists who have used the plastic inner core of a spent ball point pen, which has a nice diameter.


You'll also want some fancy beads and findings such as jump rings, spacers, and bead caps. These pretty lampwork beads are ones I purchased from Sheila at BoHo Daydreams.


To make a bead, take a strip of fabric about 2 1/2" by 6". Vary these dimensions if you want a longer or fatter bead. Smear a little fabric glue along the core about the width of the fabric strip; press one narrow end of the fabric onto the core to secure it; then roll the strip around the core, keeping some tension on it; and finish with fabric glue to secure the end. Set it aside to allow the glue to dry. Because the core material is long, you may be able to make several beads at one time, or save the trimmed off core and use it later for other beads. The bead on the left, above, was made on a trimmed off piece. I added fabric glue to the outside and pressed some seed beads into the surface to give some added shine and texture. The bead on the right is made using batik fabric. One note: don't spend too much time choosing just the right fabric as you may completely cover it, or nearly so, as you add layers. You'll trim that core material before assembling the bead with other elements and findings to complete it.


You can see what I mean here. Once the glue is dry, it's time to add the next layer. In this case I wrapped the bead with eyelash yarn so not a lot of the fabric underneath shows. Again, I used fabric glue to secure the yarn at each end of the bead. A piece of styro-foam is handy to insert the core while the glue dries. There are some other beaded projects drying there, too.


If the eyelash yarn seems a little untamed, you can reign it in by wrapping it with fine gauge wire. The wire even comes in colors! I like to wrap barber-pole style down along the bead and then back up to achieve the criss-cross look. Finish the wire by wrapping it around one end to secure it, or "style" the end like this one by forming a decorative spiral.


Here's another way to tame the yarn. String a few seed beads on fine gauge wire and wrap the wire around the BoHo bead, spacing the seed beads as you go. This one is still on the lollipop stick core which will be trimmed  with scissors so it's even with the ends of the bead.


And this example shows the use of metallic yarn to also contain the eyelash yarn. Once your BoHo bead has enough layers, and is to your liking, you're ready to complete it by assembling it on a heavier gauge wire with a loop for hanging. In our next "episode", I'll show you  how to complete the BoHo bead along with some others options for the layers. AND, I'll show you a couple of uses for the beads. That's always a question people have. "What are you going to do with those?" I rarely have an answer when I start a project, but ultimately I'll find a use. More to come!

Thursday, May 6, 2021

About Faces...


As I work on projects, I sometimes notice a theme emerging. It's not my goal, but it just seems to happen. This time the theme became faces. I began seeing faces everywhere. This shabby chic girl finally found her home in a journal cover I made to encase a composition book. She's a machine stitch-drawing done on music paper, mounted on cardboard, and layered with old lace and trims. I added a fabric tassel and a Boho bead and glued the whole collage to the front of the book. 


This shows the back cover and the pretty floral vinyl fabric I used to make the cover. I'd never sewn with vinyl before and I like the cushy feel it gives to the cover.


Twin faces! I read an article about fiber artist Brianna McCarthy (see her works here) in an old issue of Cloth, Paper Scissors. She makes large masks and faces in both fabric and paper. They looked like so much fun, I had to try my hand at making one. Or even two. Mine are very small renditions and didn't take much time to put together. Just fabric scraps, a dab of glue, some free cutting and a running stitch is all it took. Don't even ask what I'll do with them. I just never know the answer to that, and I've given up trying to find a use for what I make. I'm a process person- I just find my joy in the making!


Look who we ran into while riding bicycles in Yankeetown, FL! It's a famous face- Elvis in all his array. His movie Follow That Dream was filmed in Yankeetown, so there are lots of references to Elvis there.


Our guild had a meet up in a local park and had several freebie tables. Someone had donated a stitcher's estate collection of fabrics and more. I found these two cute panels (almost vintage) for stitch-and-stuff dolls. I don't know why I'm drawn to these, but always enjoy assembling them for some reason. I'm sure I'll find a place to donate them when they are finished. Each girl has a little pet, too. Aren't their faces cute?


Now here's a face you can't forget.... that is if you can figure out which end is the face! We had an unusual number of these Tussock Moth Caterpillars around this year. So many of them that people were commenting on social media and asking what they are. I'm going to guess the end that has red on it is the face. These are pretty, though weird looking, but don't touch! They can produce an itchy rash. It didn't take them long to cocoon and emerge as moths, of which there were also great numbers.


Oh, and I forgot to show you the fabric pocket journal I made as the demo in the Zoom class I taught and shared in my last post. I plan to use it to store various bits and pieces of watercolor exercises I've tried with instructors Joanne Sharpe and Alisa Burke. 


Saturday, April 24, 2021

Going Above and Beyond...


You may remember these cute fabric pocket journals from an older post. Recently I taught some other quilters how to make them, and am so impressed with their creative results! We used the Zoom platform to conduct the class, and we all felt that Zoom works really well for this kind of workshop. We met in the morning to go over the initial steps. Then we all sewed through the morning, and returned in the afternoon to cover the remaining steps. These are two of the sample journals I made.


Everyone agreed that the benefits of holding class on Zoom meant no lugging our sewing machines to a classroom, having everything at our fingertips so no chance of forgetting a necessary supply, and enjoying a relaxing day of stitching with friends from the convenience of home. I said it's like having friends over to sew together, but you don't have to tidy up your sewing room! This photo shows the insides of the sample journals.


One of the fun aspects of making this journal is adding a cover collage made from all sorts of bits, pieces, trims, and images. The students really showed off their creativity here. Char pieced part of her cover and then added buttons, shells, lace, and beads. So much texture!


Here's the inside of her journal, which she has started filling with mementos. Cute trims on the pockets!


JoEllen used this vintage fabric image along with beads and frou-frou trim in this journal she made as a birthday gift for a friend.


Here's the inside with decorative stitching on the pockets and a cute sewing machine charm.


Brenda printed one of her watercolor originals onto twill fabric. She then enhanced the colors with embroidery and beads. What a great way to showcase a piece of art.


Here's a close up of her stitches and beads. Brenda admitted that she spent more time on her cover than on the rest of the project as she became so absorbed in it.


Buffy incorporated giant rick rack and an extra quilt block from another project in her cover. Then she went to town with a yo-yo, a discharge printed leaf and a palm tree embellishment.


Here's the inside fabric with the pockets. A great fabric print!


Fold out again, and she has a pen holder and has already started filling the pockets with ephemera.


JoEllen made a second journal for her own use and again used decorative stitching to accent her pockets and edges. I love how she modified one of the pockets to allow her to slip in a small notebook she can change out when it's filled. She plans to use this for a travel journal and is determined that travel will soon be in the works again. She's ready now! I'm sure all of the class members will be making more of these journals soon. Their creativity definitely went above and beyond!


Thursday, April 1, 2021

Greetings!


Making this spring-like fiber postcard for a swap reminded me that I've done quite a few of these cards in the past, and it's time to get out the supplies to make more! They are a good repository for scraps plus a place to try out some different techniques. I love the butterfly print fabric that became a focal point in this piece.


The postcards can go through the mail, though may require extra postage or hand cancelling at the post office. I used a rubber stamp to create the postcard back. The Pentel gel pen for fabric is a permanent pen that worked nicely for the message. Unfortunately, these are hard to find. I'm not even sure they are manufactured anymore. 


Fusible applied to the back of fabric scraps are then collaged onto the liner, which is Peltex cut to size. Simple bits make a pretty collage design. Then I added some machine decorative stitches, layered the postcard front with the back and finished the edge with a machine satin stitch.


This postcard is one I received in a previous swap and was made by Sarah Boblit. So much handwork on this one! I like how Sarah used a raw-edge binding hand stitched in place. It's just full of texture. And she used cardstock for the back address and message area. She titled it "A Summer's Day in August."


Seed beads and French knots combine to form the large flower center. Postcards can be small yet densely rich in details like this.


And here's another flower center packed with French knots. Sarah clearly spent a lot of time making her postcard.


I used a watercolor on fabric technique to make this image with details added in Micron pen. It was a new method for me at the time, and making something small really suited the learning curve. This one has rat-tail cord couched along the edge to finish it.


And this postcard was a good place to practice Zentangles on fabric along with machine quilting. Again, this one has a close zig-zag stitch edging. I've got some Peltex all cut and ready to make some more fabric greetings. Quick, easy (as easy as you want them to be anyway), and fun!


Wednesday, March 3, 2021

It's About Time...


Don't you love these whimsical clocks? Which one is your favorite? I like the cat mermaid. We found these in a gift shop in St. Augustine last week. A gift shop? Yes! We actually visited and browsed a gift shop. Now that my husband and I have both received the vaccine, we welcomed the little boost in confidence that it gave us to venture out and try some things from the long-ago past. So we took a day trip to St. Augustine on a beautiful sunny day. We had our masks and were prepared to gauge our level of comfort with each step as we went. 

Masks off for dining.

And this is where we ate- the lovely Cafe Alcazar. It's spacious and the tables were well placed for distancing. There were very few customers while we were there, so it all felt pretty safe. And the food was good.


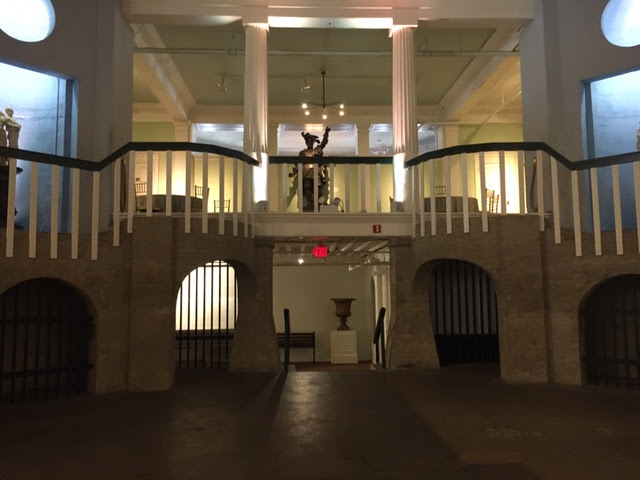
The fun thing about Cafe Alcazar is its history. This is a view of the opposite end of the restaurant. Currently the space is part of the historic Lightner Museum located in the former Hotel Alcazar. Our dining area is located in what was once the famous indoor swimming pool at the hotel's casino. There were all sorts of recreational activities available at the hotel, including a bicycle academy. Compare the two photos above to the one below that I found displayed on a wall. Fascinating!


Jump in- the water is fine! This is where we were sitting. The Gilded Age of the late 1800s was really something. You can see even better photos on the museum's website linked above. What a feat of engineering. The hotel was built by railroad magnate Henry Flagler who envisioned St. Augustine as a winter resort playground for wealthy tourists. It became the museum in the 1930s.


Outside, you can get the flavor of the oldest US city's Spanish-style architecture with its terra cotta roofs. This photo is looking east toward Flagler College. And you can just see one of the Old Town tourist trolleys coming down the street. We enjoyed wandering through the city. We kept to the side streets, which were less congested with people, just to be on the safe side. There was a mix of masks/no masks. It was so nice to do something resembling normal after a full year of pretty much going nowhere and doing not much.


Here's the courtyard of the museum, complete with a tranquil koi pond. In its heyday, there were shops all around selling ball gowns and fancy rugs. There are shops there now as well, along with city offices. We put a toe in the water of normal living, and had a lovely day of it. But we certainly remain cautious.


Thursday, February 11, 2021

Fiber Hearts and Other Arts...


Hearts are such a fun motif for stitching. This is a small stitch meditation square I made on a painted fabric background with embroidered and sequined details. They are so relaxing to sew. The only problem is that they don't use up much of the fabric stash!


And here's a heartfelt postcard made with bits and pieces and sewn by machine. We just had a postcard exchange and getting out the supplies for making one reminded me how much I enjoy making these, too! I'll show the one I mailed out in another post.


This Victorian-style pincushion is one I made several years ago. It's another repository for all the trims, buttons, and laces I like accumulating.


And for another relaxing pastime, I enrolled in Kate Crane's For the Love of Circles online class. We're learning to make whimsical Mandala drawings with watercolor, colored pencil, and marker details. This is the start of two of mine, and both need some further embellishment with paint pens and neon markers.


This one features some hearts within the Mandala. The Mandalas are surprisingly easy to make and offer so many design possibilities. I'm sure there are more of these forthcoming. I've been working to clean up my sewing room a bit, so quilting projects are sidelined right now. It's good to have some small creative projects that can be completed quickly.


Monday, January 18, 2021

It's a Little Chili...


Hello to 2021! It's a chilly start to the year in Florida. When we first moved here from upstate New York, we were surprised at how cold it feels in Florida. After all, we were used to really cold winters with sub-zero temperatures. I thought it would be all shorts and flip flops once we moved here some 20+ years ago. But somehow, when the mercury drops, the cold temps in this state are really sharp and penetrating. We've had several frosts and below-freezing temps in the past few weeks. The horses have had heavy blankets on at night, and lights in their stalls. And the dogs have worn their coats for part of the day.  Of course, comparatively with other states, cold is a relative statement. But the cold might surprise you, too. While going through some things in my sewing room, I came across this little wall quilt I made for a guild challenge a few years back. It seemed a good reflection of the cold. This shivering chili pepper has turned blue from the cold and dressed for it, too. The challenge was "Play on Words". So "Chilly Pepper" was the idea I came up with. All the best and blessings to you for 2021!