skip to main |
skip to sidebar
 Hands-free pouches worn around my neck are a go-to item for me for quilt guild meetings and quilt shows. Depending on their size, they can hold just enough items- cell phone, credit card, car keys, pen, and more. And they’re the perfect spot to pin a name tag. So it seems that I have gathered quite a collection of these over the years. That doesn’t stop me from making more when I see designs I like! And I really liked this Treasure Bag by Barb Originals. A vendor at a quilt show displayed two versions- one made from a necktie, and the other from old quilt fragments. The kit came with the pattern, a tie, and some beaded trim. Once I put it together, I sifted through my bling bits and found this old brooch. It was the perfect complement to the colors in the necktie and the bead trim, so on it went. This pouch is small, as you can envision, no wider than the body of the tie. So it doesn’t hold as much as some pouches, but I just love the vintage look and know I’ll get plenty of use from it. And I have more ties in my crazy quilt supplies.
 This roomy neck purse has double inside pockets and can hold a large cell phone, along with other items I might need. This one will be my name tag purse for a new guild I’ve recently joined- Quilters of Alachua County Day Guild. I added a few handmade fabric and paper beads, and will stitch my fabric name tag to the front. The directions for this one came in a kit from Quiltsmart which included three of the Quiltsmart interfacing pieces to iron onto fabric and then assemble to make the cell phone purse.
 And finally there’s this cell phone purse. It, too, was made using the Quiltsmart interfacing. The interfacing is marked with clear fold, stitch and cut lines so it’s very simple to put together. This heavily beaded and embellished purse contains the remnants of an earlier purse I’d used, but its size made it unsuitable to hold the newer, larger phone. So I might call this project a hybrid- partly made by me, and partly an up-cycled purse. I’ve noticed quilters always carry “stuff”. It’s one reason we have an SUV because it’s always loaded down with quilts going here, fabric going there, donations from the prison crafting program where I volunteer, totes with items needed at quilt guild or quilt classes. I often refer to myself as a “schlepper-in-chief”. These small neck purses really come in handy so I don't need to also carry a large purse in addition to the "stuff"! I used this one recently when going through airport security to keep my id safe and at the ready.
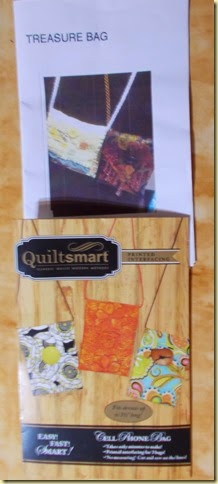 Here are the covers for the two patterns I used in making the neck purses pictured here. I still have a piece of the interfacing so I can make one of these as a gift.
 It seems as if I've never met a quilting method I didn't like. Our Fiber Art Bee recently had the chance to try out colored pencils on a quilted design. Our instructor and long-arm quilter Kim Hart prepared the quilted squares and provided the colored pencils and textile medium we needed to set the colors. We then began to “color inside the lines” as in our old coloring book days. It’s quite a relaxing process, and I set up a tray table so I could complete the project in the evening when watching tv. Once completed, I made this pillow from the quilted and colored square.
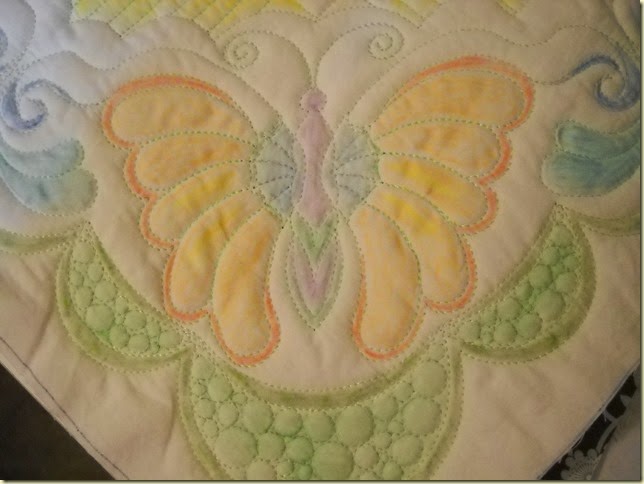 In order to deepen, blend and shade colors, I needed to go over areas more than once. Some members brought their own Prismacolor pencils or Inktense ones that gave less of a pastel look to their projects. But most of us used standard hard lead colored pencils which work nicely.
 Kim used green thread for the quilting so it was easy to define where we wanted to add color. She also offered hummingbird and floral design options, shown below.
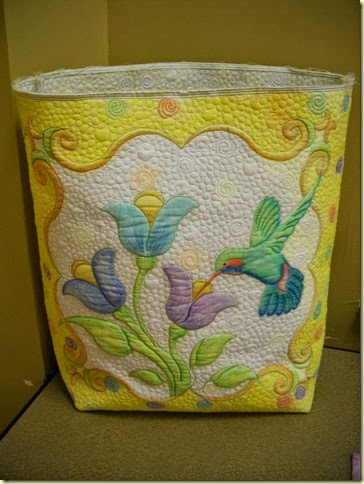 This is Kim’s tote bag which she used as a sample when teaching another class in this technique.
 My neighbor at the work table was quite adept at shading her flowers, and achieved nice color intensity. So pretty!

 Here are two more of Kim’s class sample projects. This method was lots of fun, and I can see some uses for it in future projects.
 And speaking of color-drenched, we just returned from a trip to Arizona where the desert was in bloom. It was just lovely. We’ve visited before, but are usually just ahead of the bloom. Between the pollen and the dust, allergies bloomed, too! We traveled to Prescott where we stopped at Watson Lake to see the wonderful granite formations (below) and the Phippen Museum of Western Art
.
 And we stayed in beautiful Sedona. Because this trip was a belated celebration gift for our 50th wedding anniversary, we treated ourselves to a stay at the lovely Enchantment Resort set right within the red rocks. Just magnificent!

 We never made the adjustment from Eastern time to Arizona time which is three hours earlier. That meant that we were up at 5:30 AM to capture this lovely early morning sky showing the last of the moon and the beginning of sunrise. I also had the 24-hour hot tub all to myself at sunrise. What a treat it was to watch the sun come up on the red rocks in the chill morning air.

 Good food is always a plus on a trip, and this delicious grilled scallop plate was my lunch at Renee’s of Tlaquepaque in Sedona. We had a grand time, and now we’re catching up at home, both feeling grateful for our wonderful time away.
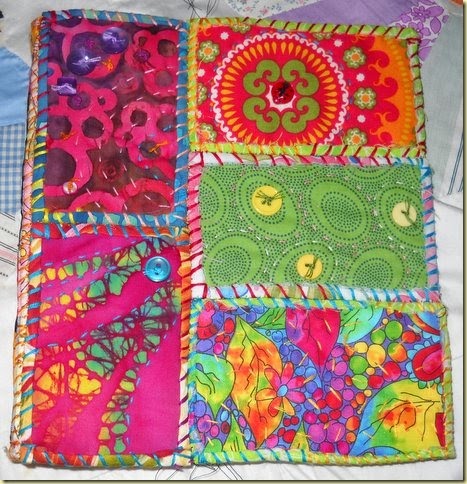 This fabric book has big dreams of someday growing to become even better than it is now. And I like it as it is. I saw this style of “quilt-lets” used to fashion a journal cover on artist Teesha Moore’s You Tube channel. There are four parts in the series, and the link will take you to part one. The appeal was instantaneous and I got pulling together fabrics and floss right away. I modified the method a little to make use of fusible batting and some machine stitching, but overall Teesha’s project suited me and all the small bits of fabrics in my stash. This is the front cover which is likely to get more embellishing over time.
 The view from the back in all its fiber-liciousness. There is something very soothing about hand stitching these small rectangles of fabric and it didn’t take long until I had enough to whipstitch together into the cover.
 Inside the book I made signatures (groups of pages) from watercolor paper and sewed various stamped, painted, and cut out elements to some of them. The photo collage above shows several of the trimmed pages. This may be a journal I’ll actually use. I have a problem that way- love to make them, find I have nothing to say when it comes time to write in them! But the watercolor paper will allow me to paint or add mixed media to it. So when the journal does grow up into its final version, it will be thoroughly colorful.
 At our recent meeting of the Alachua County Day Guild, the Fiber Arts Bee (a small group of the guild to which I also belong) did a presentation on fiber arts. The members, led by Celeste Beck of Goatfeathers Studio, all brought examples of their projects. And there I saw it- the big beautiful version of my small journal. My little book suffered immediate journal envy. This is what it can look like when it grows up-tons more embellishments and a wonderful spine made from yarns and ribbons. This book was made by Celeste and it contains her journal quilts from various challenges. She used fiberfill for the “quiltlets” so there’s a lot more texture on the cover. I had to chuckle as I noted that with all the wild and wondeful fabrics available to use, both Celeste and I placed the same pink batik in the lower left corner of the front cover. What are the chances of that??

I had already started the decorative spine for my journal, using a latch hook and grid-style slip-proof rug material. Celeste used the actual firm rug hooking material which gave her journal spine a bit more body. So this is not the end for my fabric journal- it’s going to keep on growing. It was so much fun to make, there could even be another companion journal in the future. Stay tuned!
 This pretty bundle is wrapped and ready to mail for an Easter gift for a friend. The sentiment on it says “No matter how long the Winter, Spring is sure to follow.” She lives in Pennsylvania and is quite ready for Spring, given the harsh winter season that seems to be hanging on there. The idea for this project came from seeing Pocket Letters, the creation of Janette Lane. Basically you create a Pocket Letter beginning with a 9-pocket clear page like the ones used for trading cards. Then you fill each pocket with images and other goodies, add a letter to one of the pockets, fold it up and send it through the mail to a friend in a standard #10 envelope. They’re great projects for those who enjoy colorful fun mail combined with a bit of creativity. There’s even a swap network for people who love making them along with making new friends from around the world. I chose an Easter theme and found most of the beautiful images at the Graphics Fairy site where there are thousands of free images for use in craft projects. One thing I particularly enjoyed was the chance to use a variety of images. I have a hard time choosing just one when I’m making a greeting card or other project. This time I could download to my heart’s content!
 Here’s the front side of the page before folding. In addition to the images, I was able to add little bits of tatting, trims, buttons, and flowers to decorate the pockets. A Graphic 45 image (center row, right) combined well with the others and I used a selection of scrapbooking paper in fresh looking pastels to back the images.
 Here are some close-up photos of sections of the pocket page. Because they’re made from clear plastic, it’s a challenge to photograph them clearly without getting reflective shine.
 A few more of the images that really invited me to “think Spring.” Many of them seem to be from vintage greeting cards and contain a lot of pretty detail. I think it would be fun to make one of these with a dog or cat theme, and a beach theme. Those may be next.

Can’t forget the back! I left the backs a bit more plain, but still added a few smaller images here. What does one do with a Pocket Letter? Since the pocket sheet protector is punched, they might collect them in a ring binder. I’m thinking my friend may want to take the cards out and use them in a journal of her own. But just a bit of joy coming in the mail is really quite enough for me. Easter blessings!
 There is just something about antique quilts that makes my heart beat a little faster. This display of Crazy Quilts can be found at The Suwannee Valley Shoppes in Trenton, FL. I love the warm, rich tones of the velvets in the one hanging on the wall, along with an almost stained-glass look to its tiny and random pieces. It didn’t resemble any Crazy Quilt I’d seen before.
 Neither did this one with its pieced sunflower blocks and fancy stitching in the centers. Lovely!
 The examples shown all date from the late-1800s and contain many unique elements that invite closer inspection. Look at the celluloid photo stitched into this beauty. And those lovely embroidery stitches- oh, my. It’s wonderful to see old quilts preserved and on display like this. Seeing them reminded me to share another part of the Sew Expo quilt exhibit I recently attended. In this case, today’s quilters built upon the past by completing old quilt tops with fancy machine quilting.
 The quilts you see here began as quilt tops in the collection of Brenda Groelz. Sponsored by Handi Quilter, several Handi Quilter instructors each completed a quilt top with the instructions to “quilt in a way the original quiltmaker would never have dreamed.” The quilts became part of an exhibit entitled “Heritage Quilts Made Modern.”
 The longarm quilters were truly masters of their craft as these examples illustrate. An interesting sidebar to these quilt tops is that nearly all of them had some special challenges for the longarmer to deal with- tops out of square, “blousy” fabric pieces within a block.
 It was astonishing to see how they met the challenges, and the creativity each quilter brought to her assigned quilt top.
 This close-up shows the density of the quilting, even inside the applique motifs. Stunning! I applaud the work each of the quilters did to turn the old quilt tops into a collaborative effort and to show them off in a new and exciting way. Some quilters have issues with completing old quilt tops. As for me, I doubt I’ll get all the tops finished in a lifetime, and I’d be happy to know someone might take my project to the finish line someday!
 Here’s my candidate for building on the past. I’d love to hand quilt this vibrant Dresden Plate, maybe using perle cotton thread and The Big Stitch, maybe in a peachy color. There’s a lot of white space around the blocks that would look good quilted and the background fabric is tightly woven. This is a someday project, and it joins many others! What’s your take on completing old quilt tops, or using old quilts in other projects?
 I joined a bus trip to the Original Sewing and Quilt Expo in Lakeland, Florida, this past week for an eye-popping time! What a treat to be surrounded by everything quilty, and more. The “and more” included the class I took titled “Almost Steampunk Junk.” Participants brought all sorts of metal and jewelry parts, beads, buttons, and charms. Our instructor brought even more, and we all dug in to make brooches, headbands, bracelets, necklaces- you name it. All we needed was a glue gun and some imagination. There were lots of sample pieces to inspire us, along with rubbing compounds in various colors, and hard felt to use as the base of our pieces. I’m not sure what these will be as yet- possibly brooches, or maybe the focal piece on a fabric journal cover. I’m afraid I’ve started yet another avenue of interest. I always say my problem is that I want to make at least one of everything! And look- I made two.
There were two large rooms at the event filled with vendors. Here’s what came home in my shopping bag. Abbey Lane Quilts had their patterns on sale. Barb Originals had kits to make Treasure Bags from a silk tie or quilt fragments. I love little bags! Fabrics abounded and I purchased this wonderful rust dyed fabric from Art Quilt Textiles as well as some batiks from Vogue Fabrics Store. I was not familiar with them, but they had many wonderful products in addition to fabrics of all kinds. We received two shopping bags with our entrance fee, but I filled only one. Remarkable restraint, wouldn’t you say?
There were lots of quilts on display, including the Double Wedding Ring International Quilt Challenge. This quilt is titled “Organic Pink Pickles” by Karen Williamson. It’s always interesting to see different takes on the same quilt pattern, especially when it’s made modern.
“Shadow Play” by Meg Crowley really used value contrast very effectively, while low contrast was the goal of the quilt below.
One of the trends in Modern Quilts is the use of low-volume fabrics to achieve subtle variation in the design rather than strong contrast. This is “Low Key Rings” by Colleen Molen. I like how she used prints to achieve texture in her quilt even though there is not a lot of value contrast.
I’ll share some more of the display quilts in my next post. If one of the sewing expo 3-day events is in your area, I certainly recommend that you attend if you can. The teaching staff includes some very well-known names like Nancy Zieman of Nancy’s Notions, June Colburn, and quilter Shar Jorgenson. There are plenty of free demos and special events, plus outstanding door prizes. The day we went, a Bernina sewing machine and a Juki serger were the top two prizes. It was a treat to attend and to see the great interest in home sewing.
I joined a bus trip to the Original Sewing and Quilt Expo in Lakeland, Florida, this past week for an eye-popping time! What a treat to be surrounded by everything quilty, and more. The “and more” included the class I took titled “Almost Steampunk Junk.” Participants brought all sorts of metal and jewelry parts, beads, buttons, and charms. Our instructor brought even more, and we all dug in to make brooches, headbands, bracelets, necklaces- you name it. All we needed was a glue gun and some imagination. There were lots of sample pieces to inspire us, along with rubbing compounds in various colors, and hard felt to use as the base of our pieces. I’m not sure what these will be as yet- possibly brooches, or maybe the focal piece on a fabric journal cover. I’m afraid I’ve started yet another avenue of interest. I always say my problem is that I want to make at least one of everything! And look- I made two.
There were two large rooms at the event filled with vendors. Here’s what came home in my shopping bag. Abbey Lane Quilts had their patterns on sale. Barb Originals had kits to make Treasure Bags from a silk tie or quilt fragments. I love little bags! Fabrics abounded and I purchased this wonderful rust dyed fabric from Art Quilt Textiles as well as some batiks from Vogue Fabrics Store. I was not familiar with them, but they had many wonderful products in addition to fabrics of all kinds. We received two shopping bags with our entrance fee, but I filled only one. Remarkable restraint, wouldn’t you say?
There were lots of quilts on display, including the Double Wedding Ring International Quilt Challenge. This quilt is titled “Organic Pink Pickles” by Karen Williamson. It’s always interesting to see different takes on the same quilt pattern, especially when it’s made modern.
“Shadow Play” by Meg Crowley really used value contrast very effectively, while low contrast was the goal of the quilt below.
One of the trends in Modern Quilts is the use of low-volume fabrics to achieve subtle variation in the design rather than strong contrast. This is “Low Key Rings” by Colleen Molen. I like how she used prints to achieve texture in her quilt even though there is not a lot of value contrast.
I’ll share some more of the display quilts in my next post. If one of the sewing expo 3-day events is in your area, I certainly recommend that you attend if you can. The teaching staff includes some very well-known names like Nancy Zieman of Nancy’s Notions, June Colburn, and quilter Shar Jorgenson. There are plenty of free demos and special events, plus outstanding door prizes. The day we went, a Bernina sewing machine and a Juki serger were the top two prizes. It was a treat to attend and to see the great interest in home sewing.
Similar to potato chips, one is not enough when making Snippet Rolls. I fished around in the lace and trim bins and assembled two more of these little bundles of pretty. See that cat image in the upper right? It’s an iron-on that’s been waiting in the sewing room for several years for just the right project. It’s a bit of a surprise it wasn't lost in the shuffle before finding a home in this Snippet Roll! The ruched flower is the one I learned to make in a mini-class. These sweet little rolls are the perfect home for those one-of-a-kind items that wind up in the sewing room because I can’t bear to throw them away. You can see the previous one here, and find a tutorial for making them on Carole Brungar's Madness and Mess blog here.
 Here are the two unrolled so you can see what other snippets grace each one. They’re a challenge to photograph given their long, skinny perspective.
 Because I love text on fabrics and vintage images, both of those elements needed to be a part of the Snippet Roll I plan to keep, above. The bead is one received an a handmade bead swap. Such detail and shine! It needed to be showcased.
A doily, velvet flower spray, resin heart, metal tag, scissors charm and a hang-tag pin all combine to add a bit of weight to the end of this roll. It's a gift for a friend. I think a lot of the appeal of these small projects is that they give me a chance to look through all the odd bits I’ve accumulated over the years, and to combine them in such a pleasing way. They play well together. And the rolls are relatively quick to make unless you’re a person who can’t stop adding just a little more. I’m that way, and have to finally call a halt. Otherwise I could be stitching away for another week.
Because I love text on fabrics and vintage images, both of those elements needed to be a part of the Snippet Roll I plan to keep, above. The bead is one received an a handmade bead swap. Such detail and shine! It needed to be showcased.
A doily, velvet flower spray, resin heart, metal tag, scissors charm and a hang-tag pin all combine to add a bit of weight to the end of this roll. It's a gift for a friend. I think a lot of the appeal of these small projects is that they give me a chance to look through all the odd bits I’ve accumulated over the years, and to combine them in such a pleasing way. They play well together. And the rolls are relatively quick to make unless you’re a person who can’t stop adding just a little more. I’m that way, and have to finally call a halt. Otherwise I could be stitching away for another week.
 The inspiring Thoreau quote printed on muslin certainly added to this one. And another handmade paper bead anchors the top, right next to the tea-dyed fabric flower. One thing that I notice as I’m working on a Snippet Roll is that one or two more begin to emerge as I group things that seem to go together while sifting through the items. I actually started out to make one roll this time, and just look what happened. I tend to do that same thing when making greeting cards and prayer flags, too. But that’s the joy of playing in the sewing room.
 I also recently participated in a class taught at our guild by Pat Sloan. I have always loved her whimsical folk-art style, and guild members waited a long time for Pat to come visit Ocala as her schedule is booked up far in advance. She was worth the wait! The above photo shows our class sample for "Wild and Free." Our task for the day was to learn to combine fabrics for the lively background.
Pat brought several samples of backgrounds for us to study, and she walked us through the method she uses for combining fabrics. We each brought bins and tubs full of fabric possibilities, and Pat provided the coaching we needed to pull together the fabrics for our backgrounds.
Mine took a tropical turn when I pulled out a piece of palm print and then found some interesting go-with fabrics that have lots of texture. It’s laid out but not pieced yet. And who knows what I’ll use for the fusible applique elements, which Pat covered in day two of the workshop. That’s a challenge for another day. But I’ll be sure to post it here when it’s finished. I get lots of projects going at once, and the sewing room is often in turmoil. However, a good percentage of my projects do make it to the finish line ultimately!
I also recently participated in a class taught at our guild by Pat Sloan. I have always loved her whimsical folk-art style, and guild members waited a long time for Pat to come visit Ocala as her schedule is booked up far in advance. She was worth the wait! The above photo shows our class sample for "Wild and Free." Our task for the day was to learn to combine fabrics for the lively background.
Pat brought several samples of backgrounds for us to study, and she walked us through the method she uses for combining fabrics. We each brought bins and tubs full of fabric possibilities, and Pat provided the coaching we needed to pull together the fabrics for our backgrounds.
Mine took a tropical turn when I pulled out a piece of palm print and then found some interesting go-with fabrics that have lots of texture. It’s laid out but not pieced yet. And who knows what I’ll use for the fusible applique elements, which Pat covered in day two of the workshop. That’s a challenge for another day. But I’ll be sure to post it here when it’s finished. I get lots of projects going at once, and the sewing room is often in turmoil. However, a good percentage of my projects do make it to the finish line ultimately!


